You can connect Salesforce with Treasure Data for greater control over your Salesforce data and better integration with the other business applications in your marketing and sales operations stack.
Integrating Salesforce with Treasure Data makes it easy to:
- Add new features to Salesforce. For example, you can prevent churn by tracking web usage and receiving alerts when customers' product usage declines.
- Use Salesforce data to improve other parts of your marketing stack. For example, you can increase your Facebook Ads ROI by automatically removing new customers from your Facebook Custom Audiences.
For sample workflows on importing data from Salesforce, go to Treasure Boxes.
If you don't have a Treasure account, contact us so we can set you up.
- SOQL: This configuration allows a custom SOQL (Salesforce Object Query Language) to query and filter data. With SOQL, you can retrieve the data from a single object or multiple objects that are related to each other. You can pick specific columns and filter or sort the output with your conditional statement. As a limitation, our data connector doesn't support SOQL syntax such as count() FROM Object and SELECT * from salesforceObject.
- Bulk API limits: Bulk API offers faster ingestion but also has a limitation of 10,000 batch allocations within 24 hours. If your target is large, your entire available batch allocation might be consumed, eventually causing your job to fail. If you try to use the Bulk API, and the result is ingesting all records, consider enabling the synchronous transfer-only option and using REST API. REST API avoids the batch allocation limitation but might be slower.
- SOQL with the LIMIT clause: SOQL queries do not function properly with the LIMIT clause in the Bulk API mode. The Bulk API is specifically designed for handling large volumes of data. To use the LIMIT clause, it is imperative to utilize the REST API instead.
- OAuth: OAuth doesn't support custom domains. Thus if you are using a custom domain, please use credentials as the authentication method.
SFDC import supports these authentication types:
- Credentials (Deprecated)
- Enabled username & password flow: SETTINGS → Identity → OAuth and OpenID Connect Settings → Allow OAuth Username-Password Flows (turn it on)
- OAuth Policies: PLATFORM TOOLS → App → Connected Apps → Manage Connected Apps → Choose App → Edit Policies → Permitted Users (selected: All users may self-authorize)
- This method is deprecated. Salesforce External Client Apps (ECA) do not support the Username-Password OAuth flow. Migrate to Client Credentials or OAuth.
- OAuth
- Client Credentials (Recommended for External Client Apps)
- Uses OAuth 2.0 Client Credentials Flow. Requires only
client_idandclient_secret. No username, password, or security token needed.
- Uses OAuth 2.0 Client Credentials Flow. Requires only
Using Session ID for authentication is not supported for import.
The Session ID is supported only for Salesforce Export Integration.
Connecting to Salesforce using the Treasure Console is quick and easy. Alternatively, you can create a Salesforce connection using the command line. The import integration supports Client Credentials; you need a client ID and client secret to authenticate using Client Credentials.
This is the guide for Lightning Experience UI.
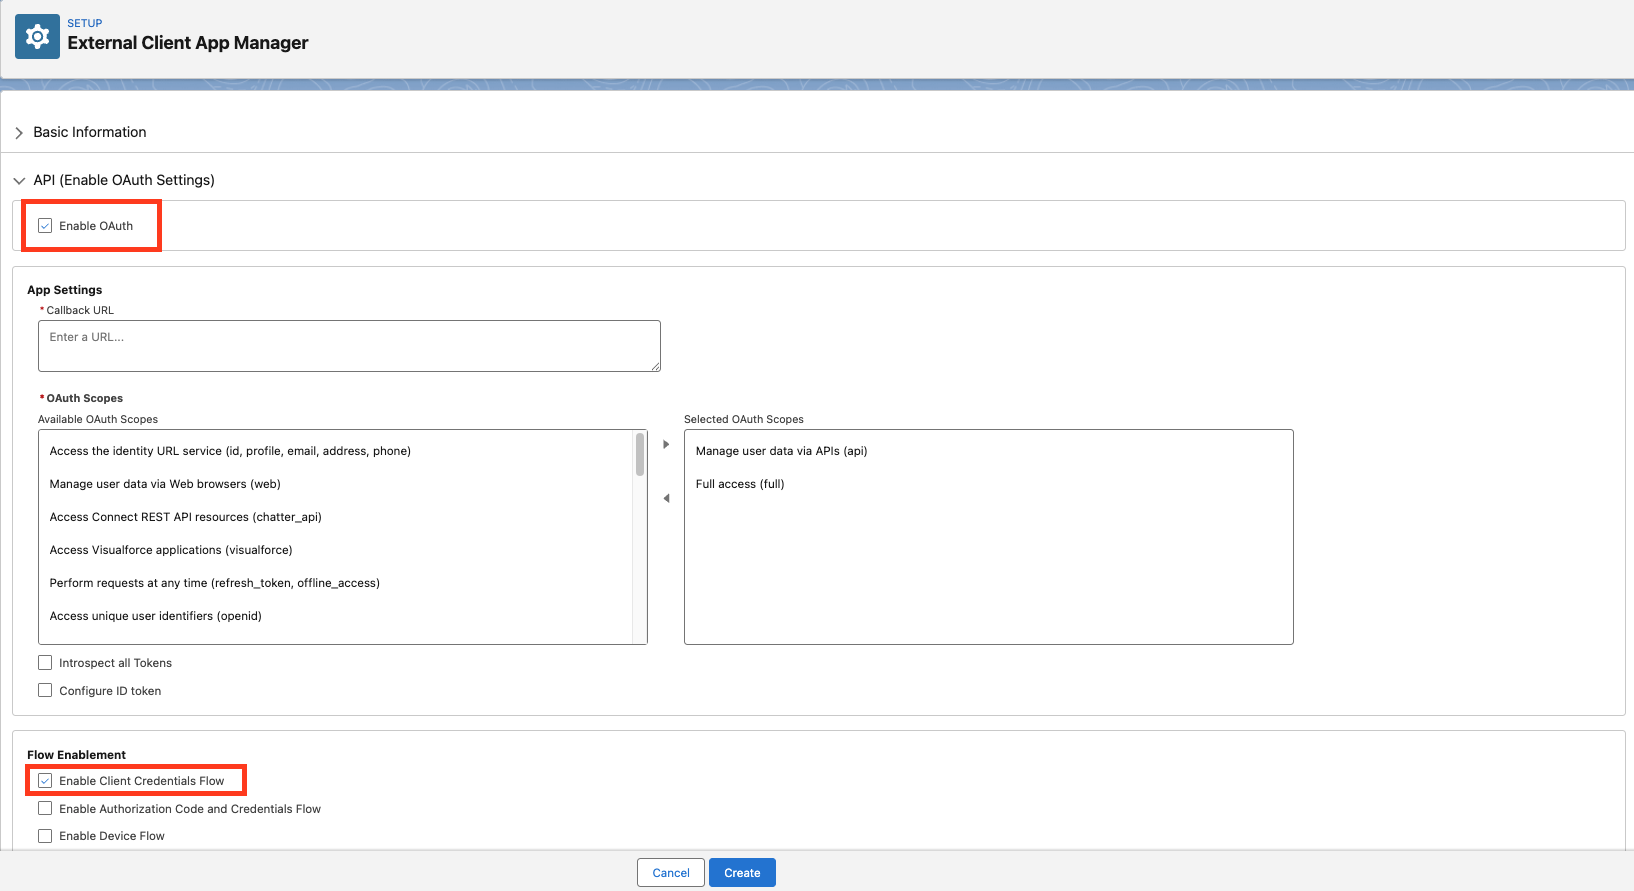
These instructions guide you to set up an External Client App (ECA) on Salesforce to use the Client Credentials Flow.
- Go to Setup > Apps > External Client Apps > External Client App Manager.
- Add new or edit your app.
- In the Settings tab, click Edit.
- Expand OAuth Settings.
- Add the required OAuth Scopes.
- Check Enable Client Credentials Flow.
- Click Save.
- In the Policies tab, click Edit.
- Expand OAuth Policies.
- Check Enable Client Credentials Flow.
- Fill in Run As (Username) — this is the Salesforce user the integration will run as.
- Click Save.
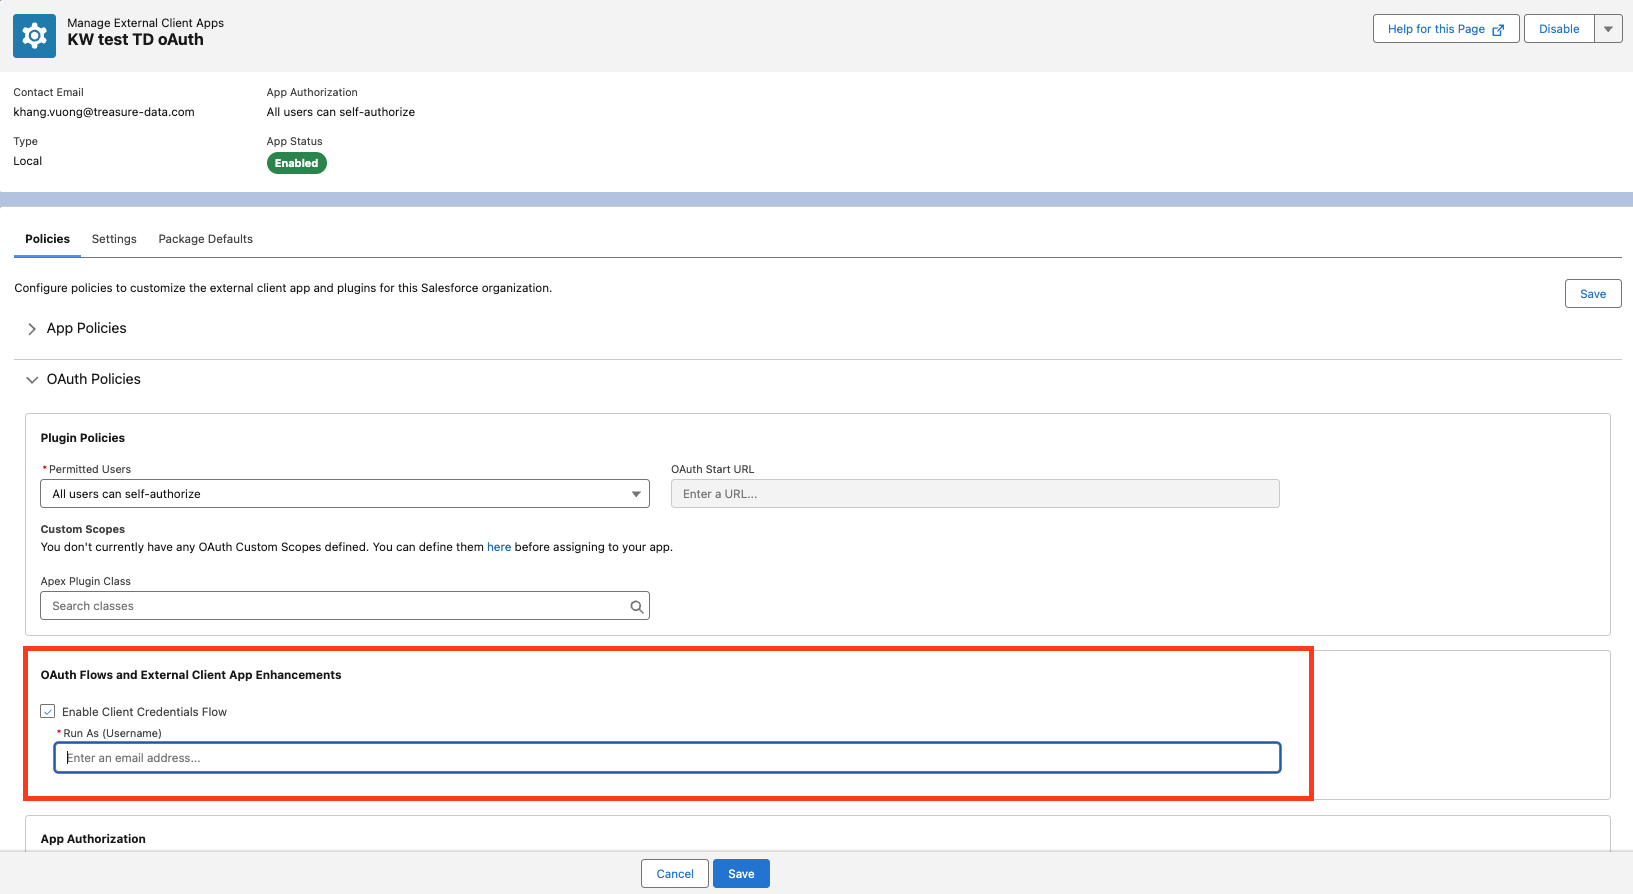
After saving, note your app's Consumer Key (client_id) and Consumer Secret (client_secret) from the Settings tab — you will need these to configure the connection in Treasure Data.
These instructions guide you to locate the client ID and client secret necessary to authenticate using credentials.
Go to Setup > Apps > App Manager.
Select New Connected App.
Set some values and check to Enable OAuth Settings. Then, grant OAuth permission scope.
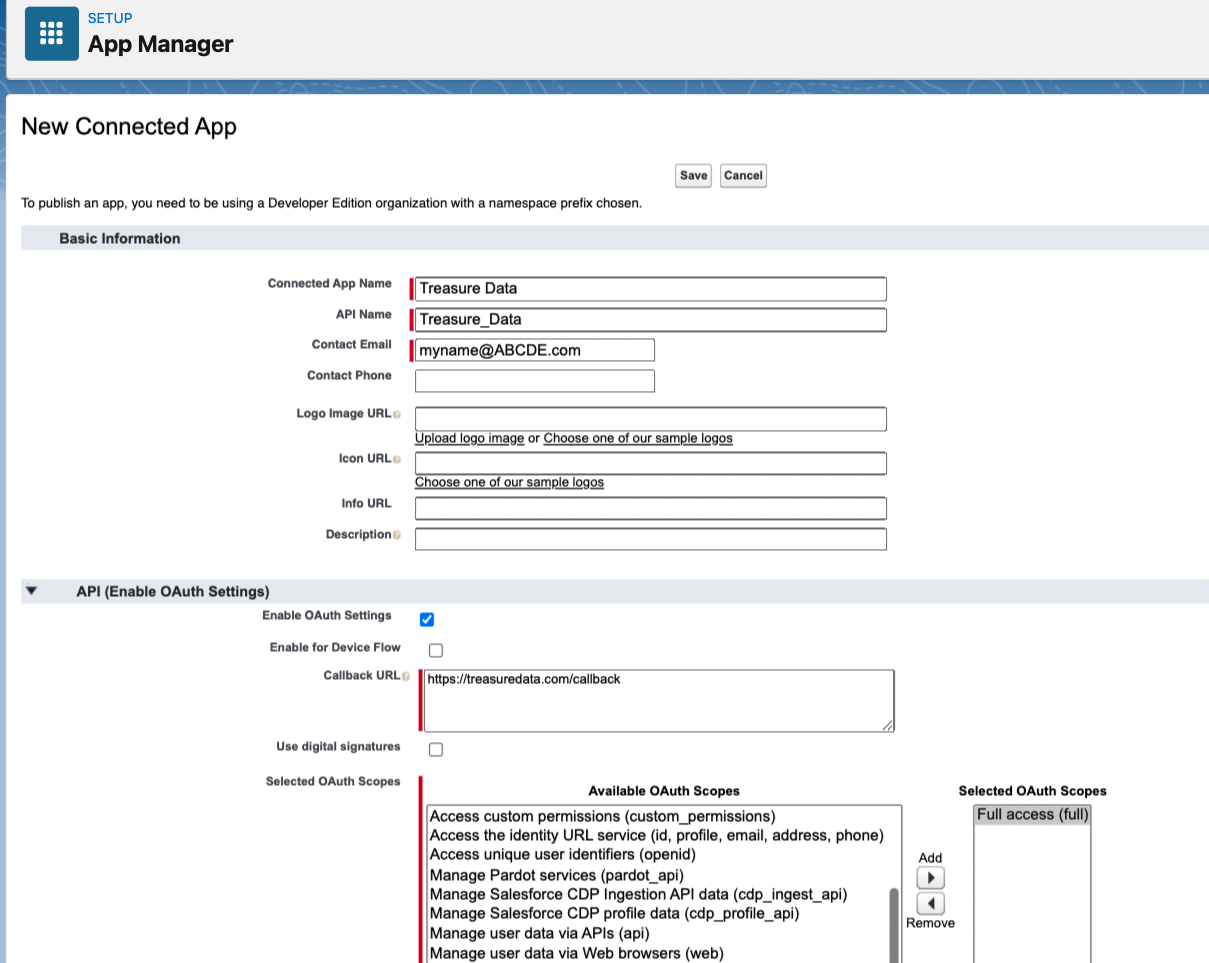
Click Save. Activation can take up to 10 minutes.
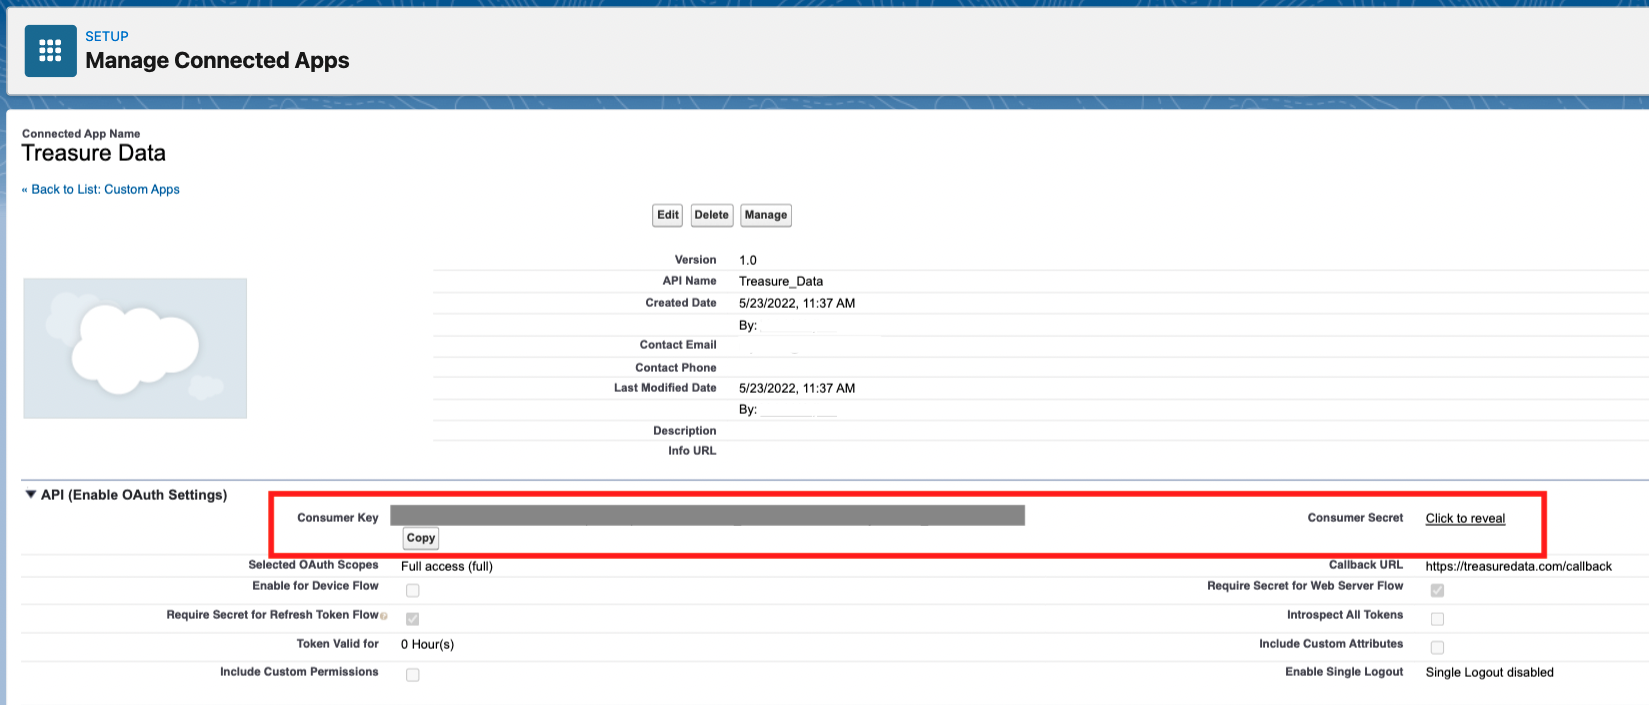
Go to Setup > Apps > App Manager.
Locate the connected app, click ▼, and then select View.

Write down or copy your Consumer Key (client_id) and Consumer Secret (client_secret).
- Open Treasure Console.
- Navigate to Integrations Hub > Catalog and search for Salesforce
- Choose one of the following:
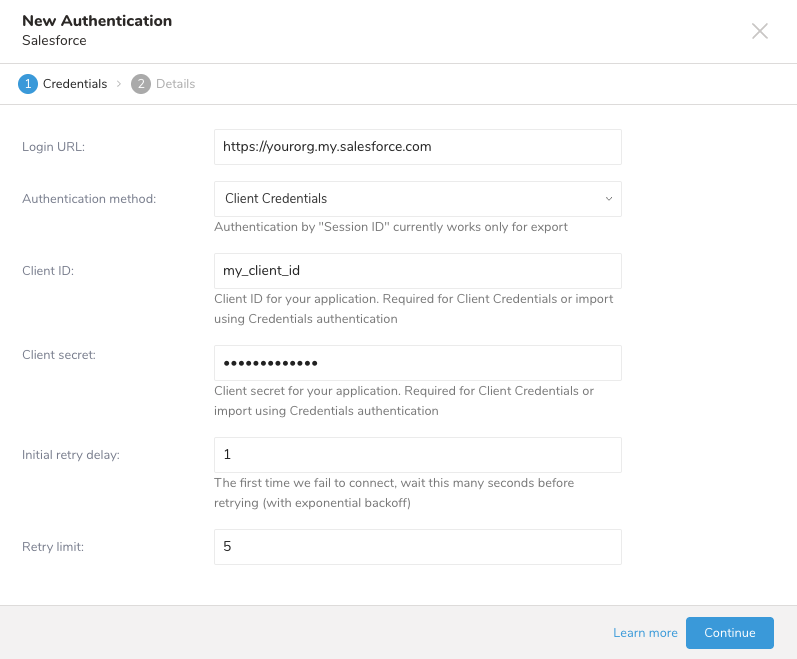
- Select Client Credentials as the authentication method.
- Enter your Client ID and Client Secret from your External Client App.
- In the Login URL field, enter your Salesforce My Domain URL (for example,
https://yourorg.my.salesforce.com). The generichttps://login.salesforce.comURL is not supported for Client Credentials Flow. See Salesforce OAuth 2.0 Client Credentials Flow for details.
To validate the user permission, make sure to use Salesforce to validate the following:
- Authority: check the Salesforce import integration connection steps.
- Allowed access to Salesforce from Treasure Data: sometimes configuring this requires knowing and configuring your TD static IP address. Contact support if you need the static IP address information.
Without properly configured authority and access, you might encounter access restriction errors. For example:
Response not 2xx:
400 Bad Request {"error":"invalid_grant","error_description":"authentication failure"}
Learn more about Object and Field Permissions for Salesforce CRM in Data Cloud.
After creating the authenticated connection, you are automatically taken to Authentications.
Search for the connection you created.
Select New Source.
Type a name for your Source in the Data Transfer field.
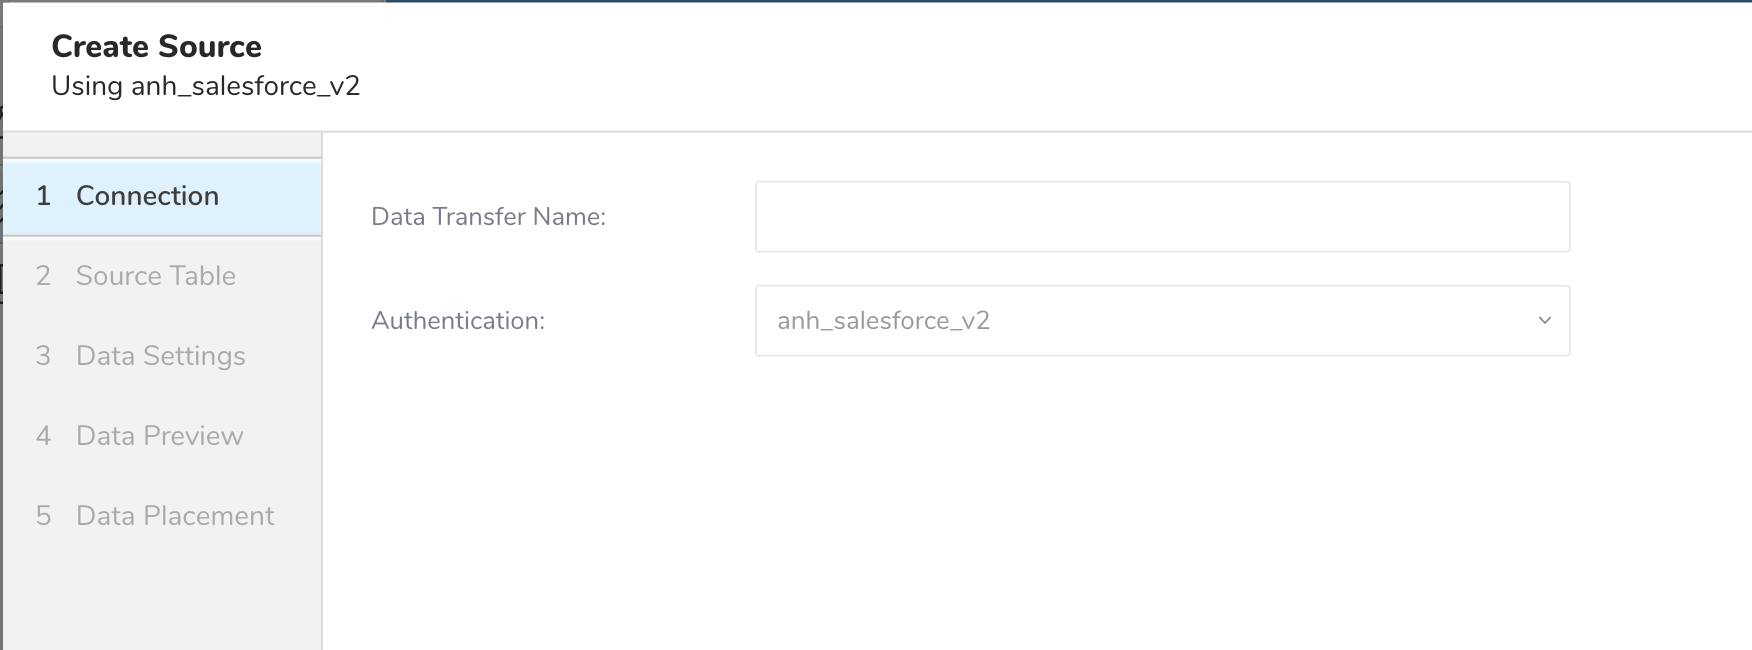
Click Next.
Edit the following parameters:
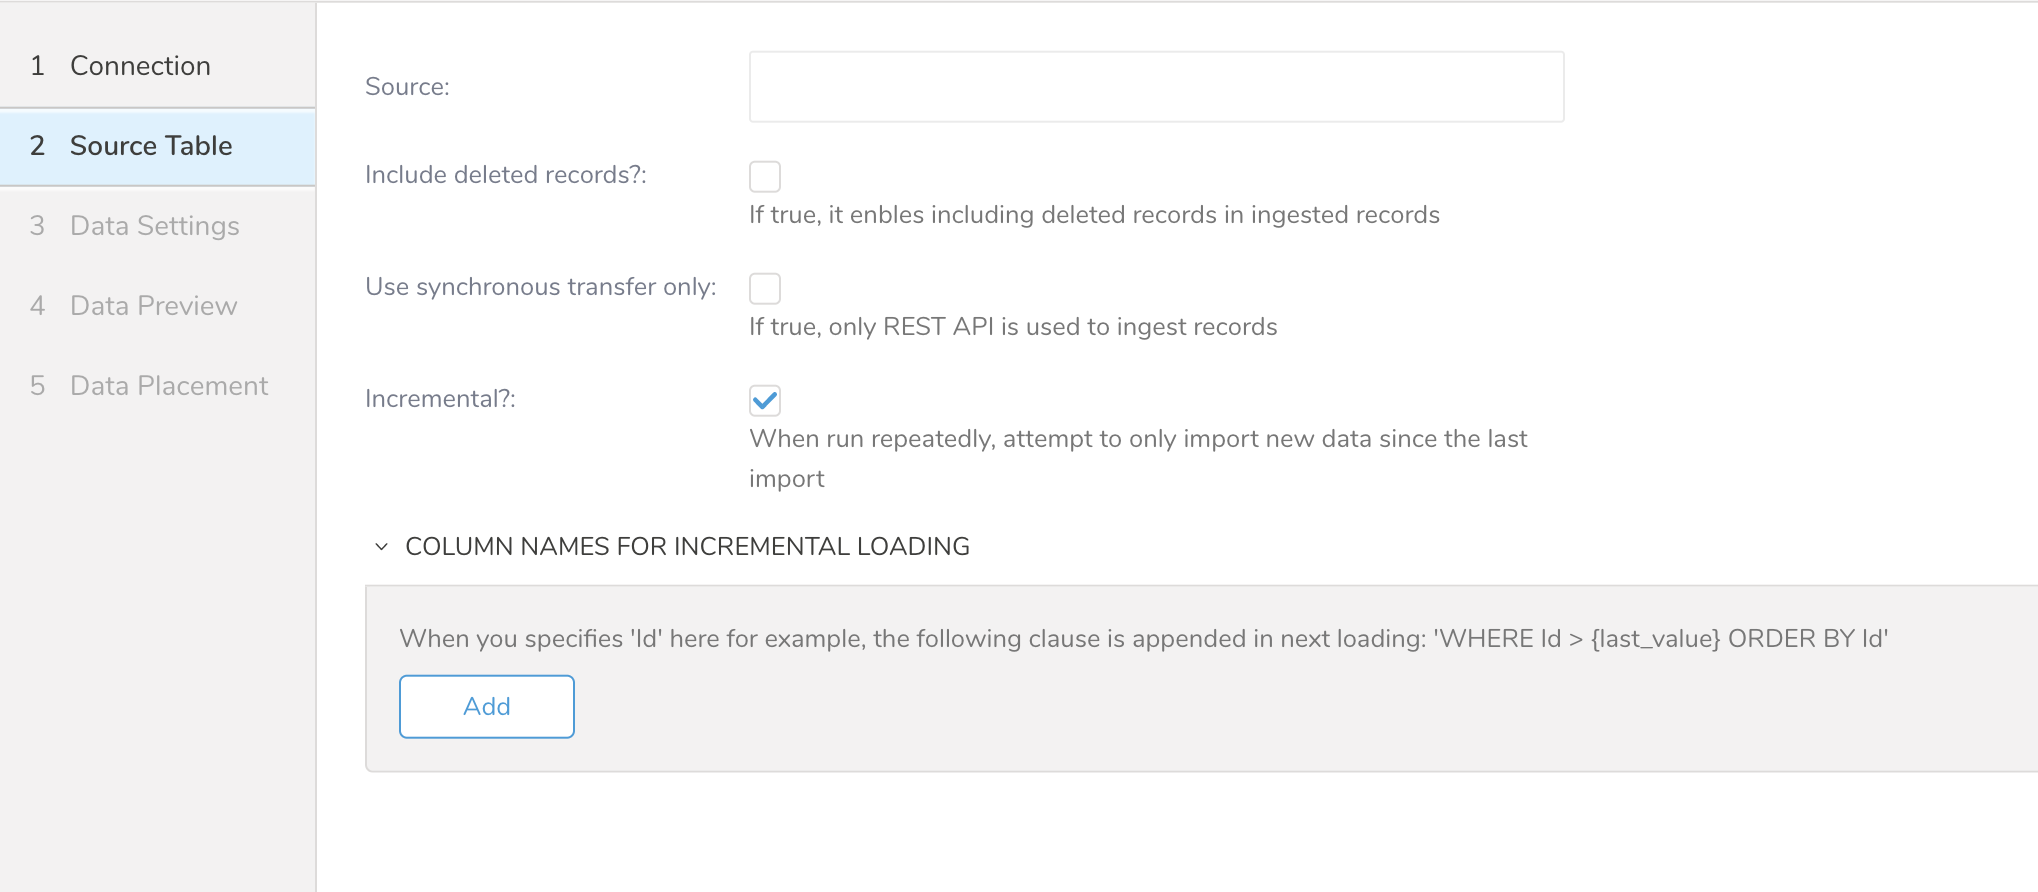
| Parameters | Description |
|---|---|
| Source | Name of the object you want to import |
| Include deleted records | Enables including deleted records |
| Use synchronous transfer only | Enables synchronous transfer using REST API |
| Incremental | Imports only new data since the last import |
Select Next. The Data Settings page opens.
You can edit the SOQL query, WHERE conditions, and Schema settings here.
Optionally, skip this page of the dialog.
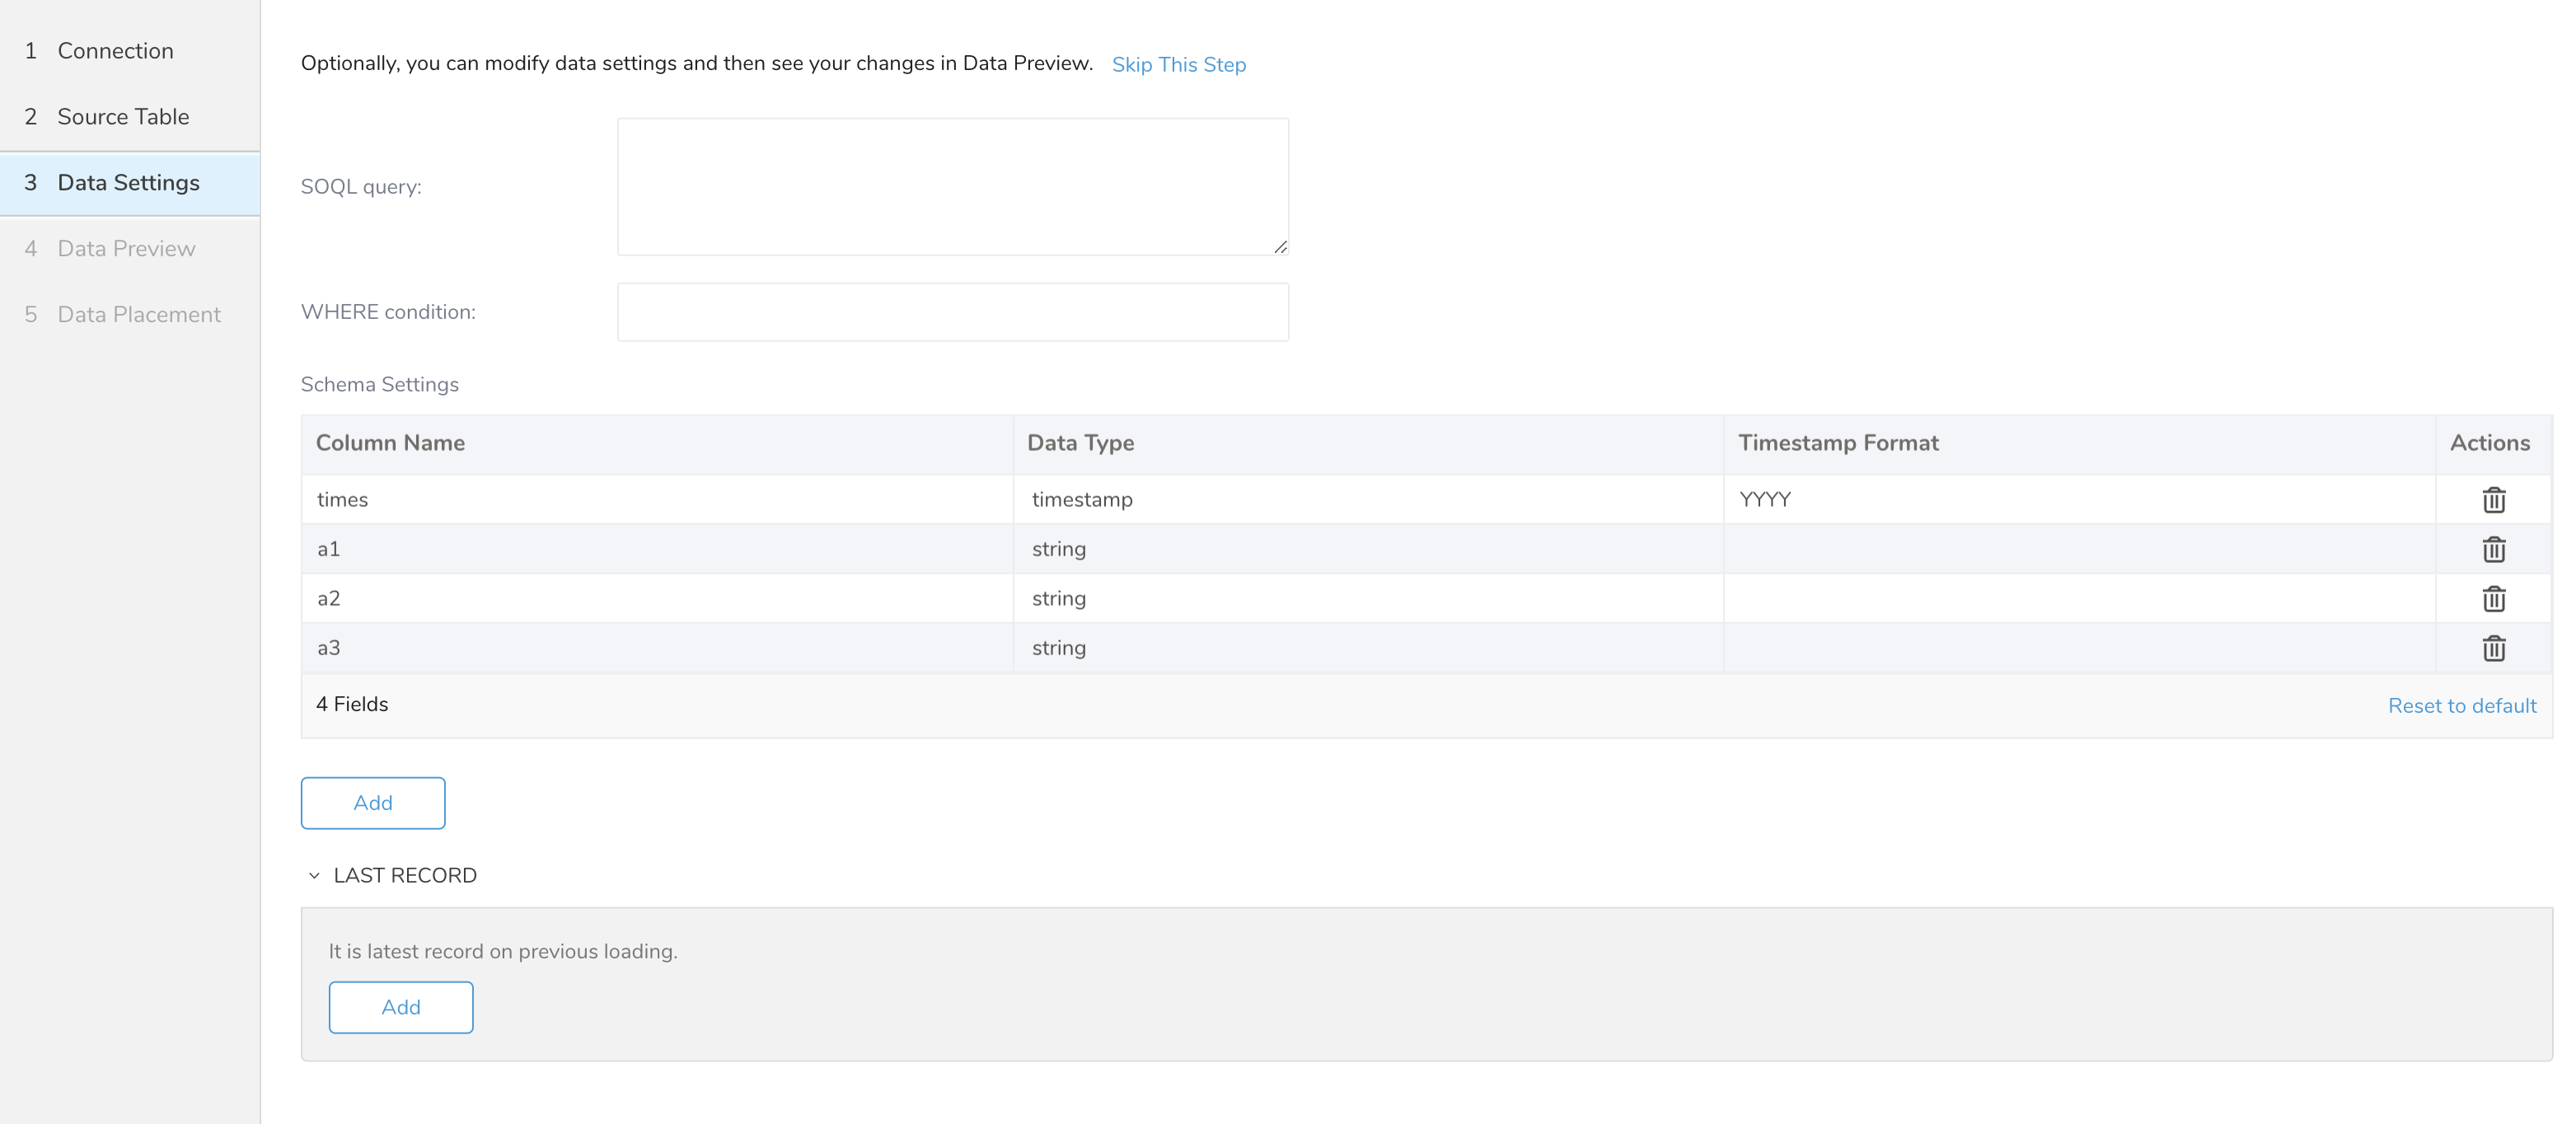
You can see a preview of your data before running the import by selecting Generate Preview. Data preview is optional and you can safely skip to the next page of the dialog if you choose to.
- Select Next. The Data Preview page opens.
- If you want to preview your data, select Generate Preview.
- Verify the data.
For data placement, select the target database and table where you want your data placed and indicate how often the import should run.
Select Next. Under Storage, you will create a new or select an existing database and create a new or select an existing table for where you want to place the imported data.
Select a Database > Select an existing or Create New Database.
Optionally, type a database name.
Select a Table> Select an existing or Create New Table.
Optionally, type a table name.
Choose the method for importing the data.
- Append (default)-Data import results are appended to the table. If the table does not exist, it will be created.
- Always Replace-Replaces the entire content of an existing table with the result output of the query. If the table does not exist, a new table is created.
- Replace on New Data-Only replace the entire content of an existing table with the result output when there is new data.
Select the Timestamp-based Partition Key column. If you want to set a different partition key seed than the default key, you can specify the long or timestamp column as the partitioning time. As a default time column, it uses upload_time with the add_time filter.
Select the Timezone for your data storage.
Under Schedule, you can choose when and how often you want to run this query.
- Select Off.
- Select Scheduling Timezone.
- Select Create & Run Now.
- Select On.
- Select the Schedule. The UI provides these four options: @hourly, @daily and @monthly or custom cron.
- You can also select Delay Transfer and add a delay of execution time.
- Select Scheduling Timezone.
- Select Create & Run Now.
After your transfer has run, you can see the results of your transfer in Data Workbench > Databases.
A. This is a column that SFDC import integration automatically created. It includes the API request URI and a target object.