Learn more about OneDrive Import Integration.
You can send job results directly to your OneDrive account.
Continue to the following topics:
- Basic knowledge of Treasure AI, including the TD Toolbelt
- A OneDrive or SharePoint account
- Authorized Treasure account access
When you configure a data connection, you provide authentication to access the integration. In Treasure AI, you configure the authentication and then specify the source information.
Go to Integrations Hub -> Catalog and search and select OneDrive.
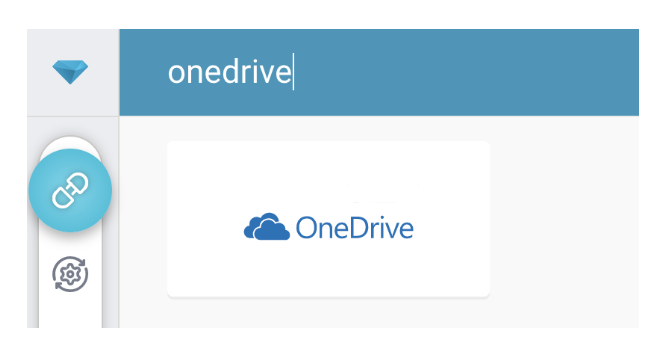
The following dialog opens.
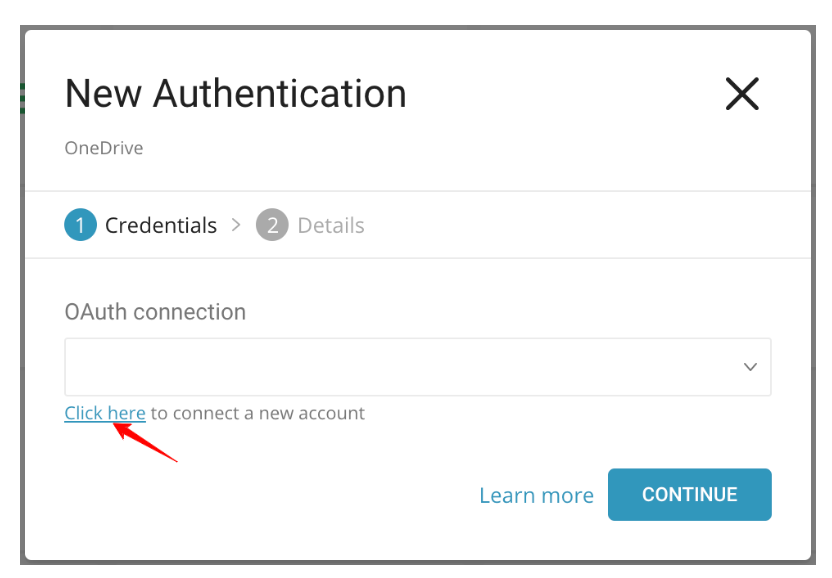
Access to Treasure AI OneDrive requires OAuth2 authentication. The authentication requires that users manually connect their Treasure account to their respective OneDrive account.
There are two authentication setups that affect how an admin user or a normal user in your Microsoft's tenant authenticates to the connector:
- Direct User Authentication:: The user's Microsoft tenant does not require pre-approval by an admin. Any user within the organization can authenticate the connector directly through the OAuth authentication flow without needing prior approval from an admin.
- Admin Pre-Approval Required:: The user's Microsoft tenant is configured such that an admin must pre-approve the data connector before any regular user can authenticate it. This setup is commonly found in organizations with stricter security controls, where the admin must grant permissions to the application on behalf of the entire organization. Once the connector is pre-approved, regular users can proceed with the OAuth authentication flow to connect their accounts to Microsoft OneDrive.
For Direct User Authentication: To authenticate, complete the following procedure:
- Select Click here to connect to a new account.
- Log into your OneDrive account in the popup window and grant access to the Treasure AI app.
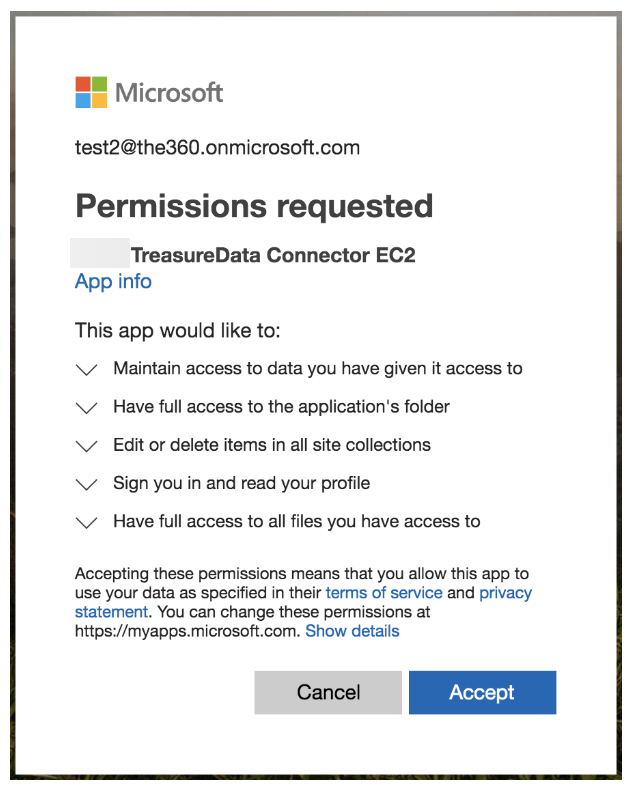
- You will be redirected back to Treasure Console. Repeat the first step (Create a new connection) and choose your new OAuth connection.
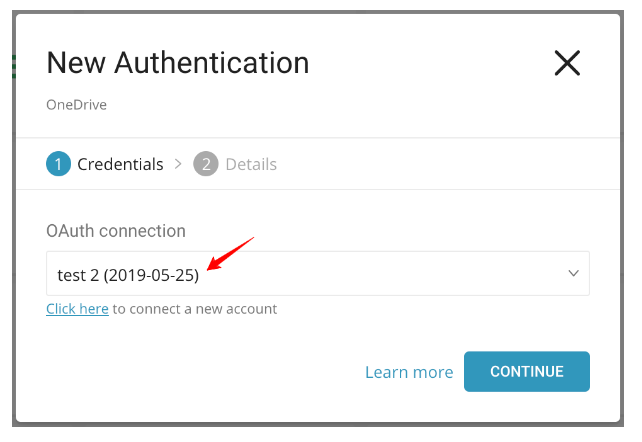
- Name your new OneDrive Connection. Select Done.
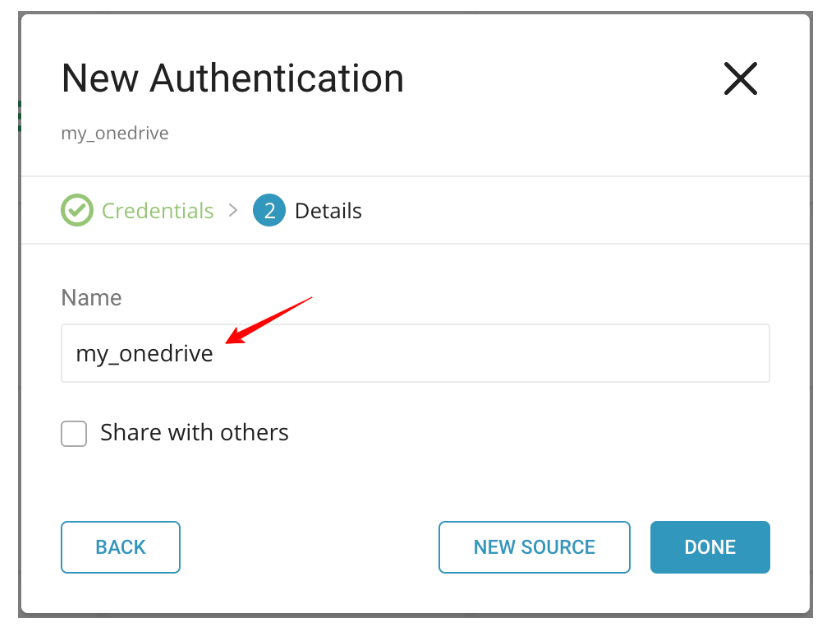
- For Admin Pre-Approval Required, the authentication flow will be similar, except that an admin user has to do the first step of pre-approving the connector for the entire organization:
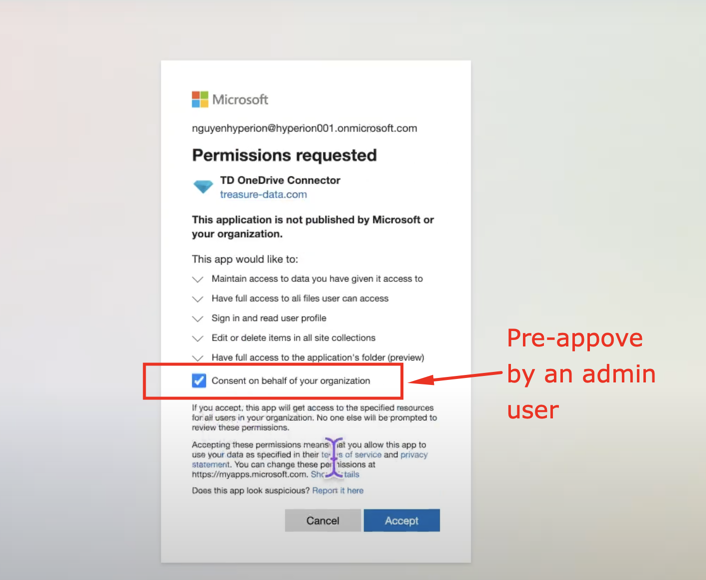
Once this step is completed, any regular user within the same Microsoft tenant can authenticate the connector without needing to go through the consent grant screen again.
In this step, you create or reuse a query. In the query, you configure the data connection.
- Go to the Treasure Console query editor page.
- Access the query that you plan to use to export data.
- Compile the query, if you need to.
- Select Export Results.
- Type the connection name in the search box to filter and select your OneDrive connection.
- Edit all the information.
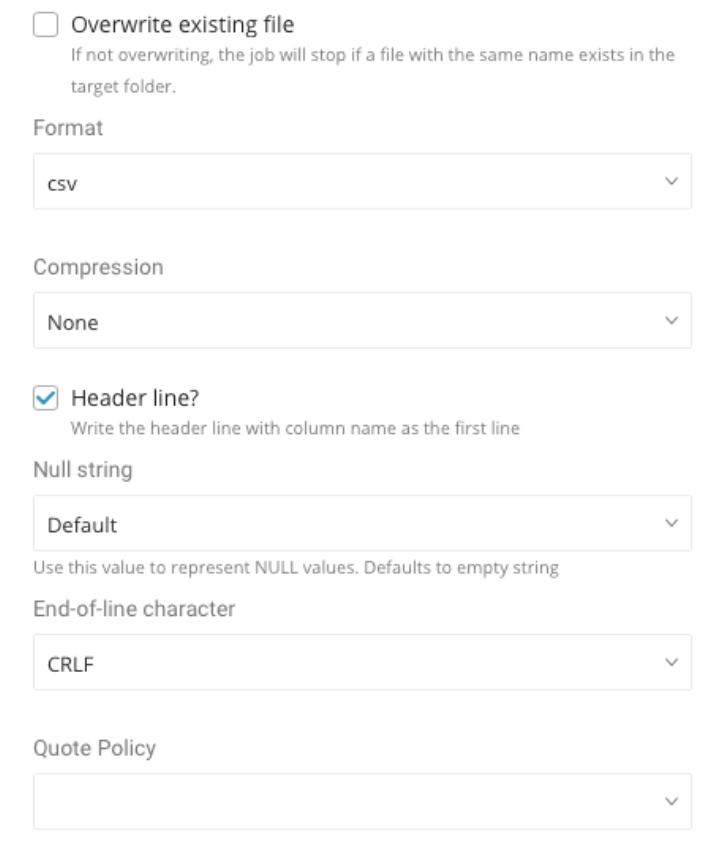
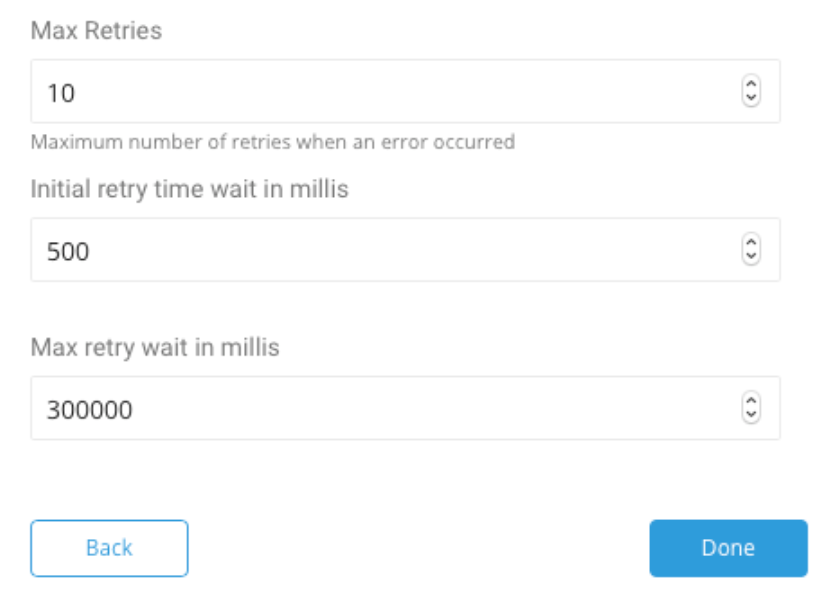
Configure the following options:
| Option | Description |
|---|---|
OneDrive Account Plan | There are two account plans:
|
| Domain Name | Domain of the folder. |
| Relative Path | The relative path of the user's folder in OneDrive or SharePoint site. |
| Folder Path | Directory of the folder in OneDrive or SharePoint. |
| File Name | Destination file name. Multibyte characters cannot be used. |
| This is a shared folder | Select if the folder is shared with you by someone. |
| Format | File extension. |
| Encoders | Indicate whether the result is to be compressed or not. Available options: None, gz, and bzip2, encryption PGP. |
| Public Key | The public key is used to encrypt the file before being uploaded. |
| Key Identifier | Specifies the Key ID of the encryption subkey used to secure the file. The master key is excluded from the encryption process. |
| Armor | Whether to use ASCII armor or not. |
Compression Type | Defines the compression algorithm used to compress the file, which will be compressed before encryption for uploading to the OneDrive server. Please ensure that you compress your file before encrypting and uploading. When you decrypt it, the file will return to a compressed format such as .gz or .bz2. |
| Header line | Select if the exported data has the column name as the header line. |
Null String | Use this value to represent NULL values. Available options:
|
| End-of-line character | The character at the end of lines. Available options are CRLF, LF, and CR. |
Quote Policy | Available options:
|
| Max Retries | When an error occurs due to a OneDrive server error or network error, the number of retries attempted before aborting the upload. |
| Initial Retry Time Wait In Millies | When error occurs, initial waiting time for a retry, double the waiting time after each retry. |
| Max Retry Wait In Millies | The upper limit waiting time for a retry. |
You can use Scheduled Jobs with Result Export to periodically write the output result to a target destination that you specify.
Treasure Data's scheduler feature supports periodic query execution to achieve high availability.
When two specifications provide conflicting schedule specifications, the specification requesting to execute more often is followed while the other schedule specification is ignored.
For example, if the cron schedule is '0 0 1 * 1', then the 'day of month' specification and 'day of week' are discordant because the former specification requires it to run every first day of each month at midnight (00:00), while the latter specification requires it to run every Monday at midnight (00:00). The latter specification is followed.
Navigate to Data Workbench > Queries
Create a new query or select an existing query.
Next to Schedule, select None.
In the drop-down, select one of the following schedule options:
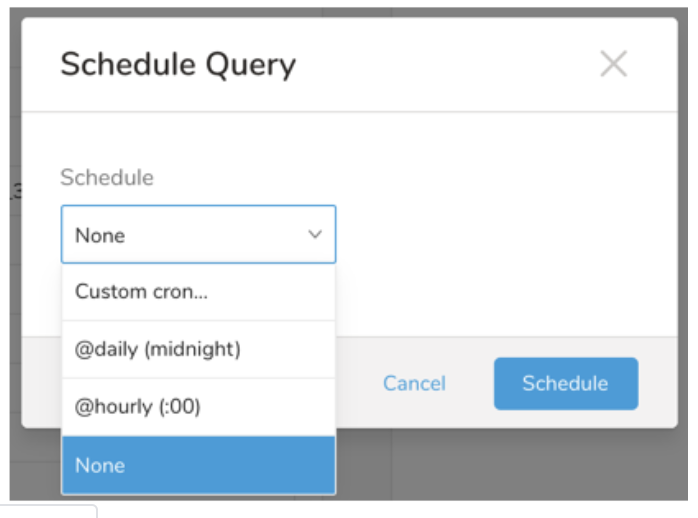
Drop-down Value Description Custom cron... Review Custom cron... details. @daily (midnight) Run once a day at midnight (00:00 am) in the specified time zone. @hourly (:00) Run every hour at 00 minutes. None No schedule.
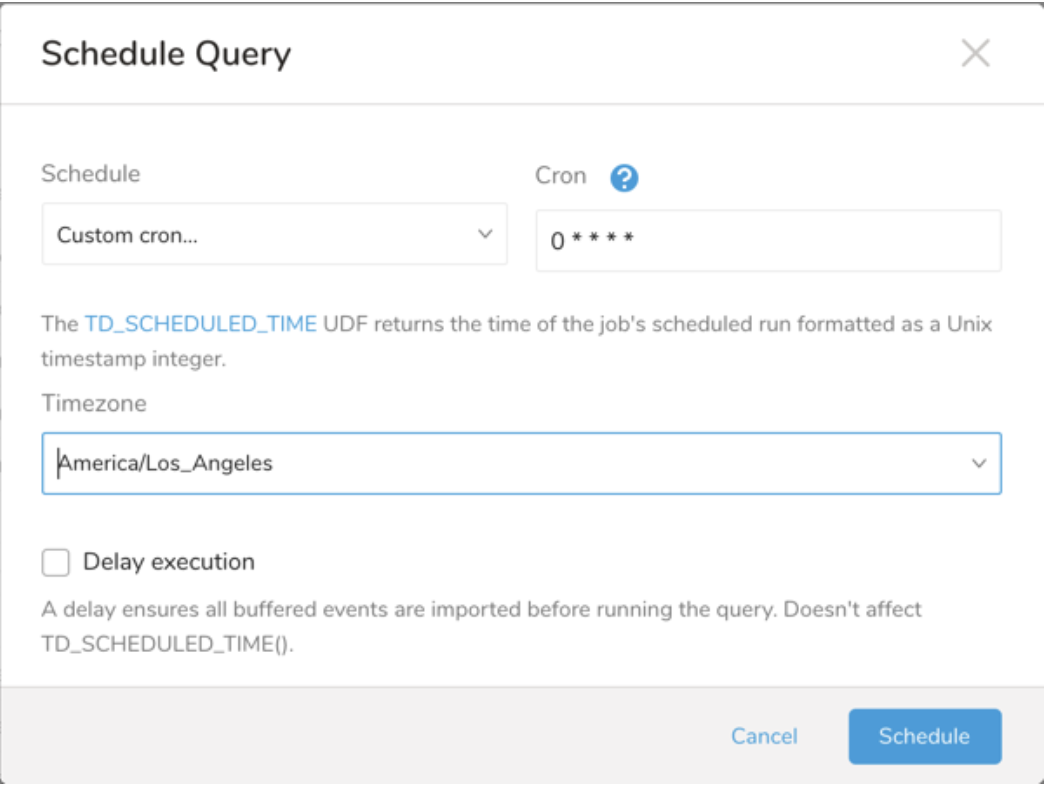
| Cron Value | Description |
|---|---|
0 * * * * | Run once an hour. |
0 0 * * * | Run once a day at midnight. |
0 0 1 * * | Run once a month at midnight on the morning of the first day of the month. |
| "" | Create a job that has no scheduled run time. |
 *    *    *    *    *
 -    -    -    -    -
 |    |    |    |    |
 |    |    |    |    +----- day of week (0 - 6) (Sunday=0)
 |    |    |    +---------- month (1 - 12)
 |    |    +--------------- day of month (1 - 31)
 |    +-------------------- hour (0 - 23)
 +------------------------- min (0 - 59)
The following named entries can be used:
- Day of Week: sun, mon, tue, wed, thu, fri, sat.
- Month: jan, feb, mar, apr, may, jun, jul, aug, sep, oct, nov, dec.
A single space is required between each field. The values for each field can be composed of:
| Field Value | Example | Example Description |
|---|---|---|
| A single value, within the limits displayed above for each field. | ||
A wildcard '*' to indicate no restriction based on the field. | '0 0 1 * *' | Configures the schedule to run at midnight (00:00) on the first day of each month. |
A range '2-5', indicating the range of accepted values for the field. | '0 0 1-10 * *' | Configures the schedule to run at midnight (00:00) on the first 10 days of each month. |
A list of comma-separated values '2,3,4,5', indicating the list of accepted values for the field. | '0 0 1,11,21 * *' | Configures the schedule to run at midnight (00:00) every 1st, 11th, and 21st day of each month. |
A periodicity indicator '*/5' to express how often based on the field's valid range of values a schedule is allowed to run. | '30 */2 1 * *' | Configures the schedule to run on the 1st of every month, every 2 hours starting at 00:30. '0 0 */5 * *' configures the schedule to run at midnight (00:00) every 5 days starting on the 5th of each month. |
A comma-separated list of any of the above except the '*' wildcard is also supported '2,*/5,8-10'. | '0 0 5,*/10,25 * *' | Configures the schedule to run at midnight (00:00) every 5th, 10th, 20th, and 25th day of each month. |
- (Optional) You can delay the start time of a query by enabling the Delay execution.
Save the query with a name and run, or just run the query. Upon successful completion of the query, the query result is automatically exported to the specified destination.
Scheduled jobs that continuously fail due to configuration errors may be disabled on the system side after several notifications.
(Optional) You can delay the start time of a query by enabling the Delay execution.
SELECT email, first_name, last_name, region, age, gender, website FROM ( VALUES ('kate1@gmail.com', 'Kate', 'Tiny', 'Asia', '41 and above', 'female', 'google.com'), ('ronan@gmail.com', 'R', 'P', 'Americas', '21-30', 'male', 'google.com'), ('michelle@gmail.com', 'M', 'C', 'EMEA', '31-40', 'male', 'facebook.com')) tbl (email, first_name, last_name, region, age, gender, website);You can also send segment data to the target platform by creating an activation in the Audience Studio.
- Navigate to Audience Studio.
- Select a parent segment.
- Open the target segment, right-mouse click, and then select Create Activation.
- In the Details panel, enter an Activation name and configure the activation according to the previous section on Configuration Parameters.
- Customize the activation output in the Output Mapping panel.
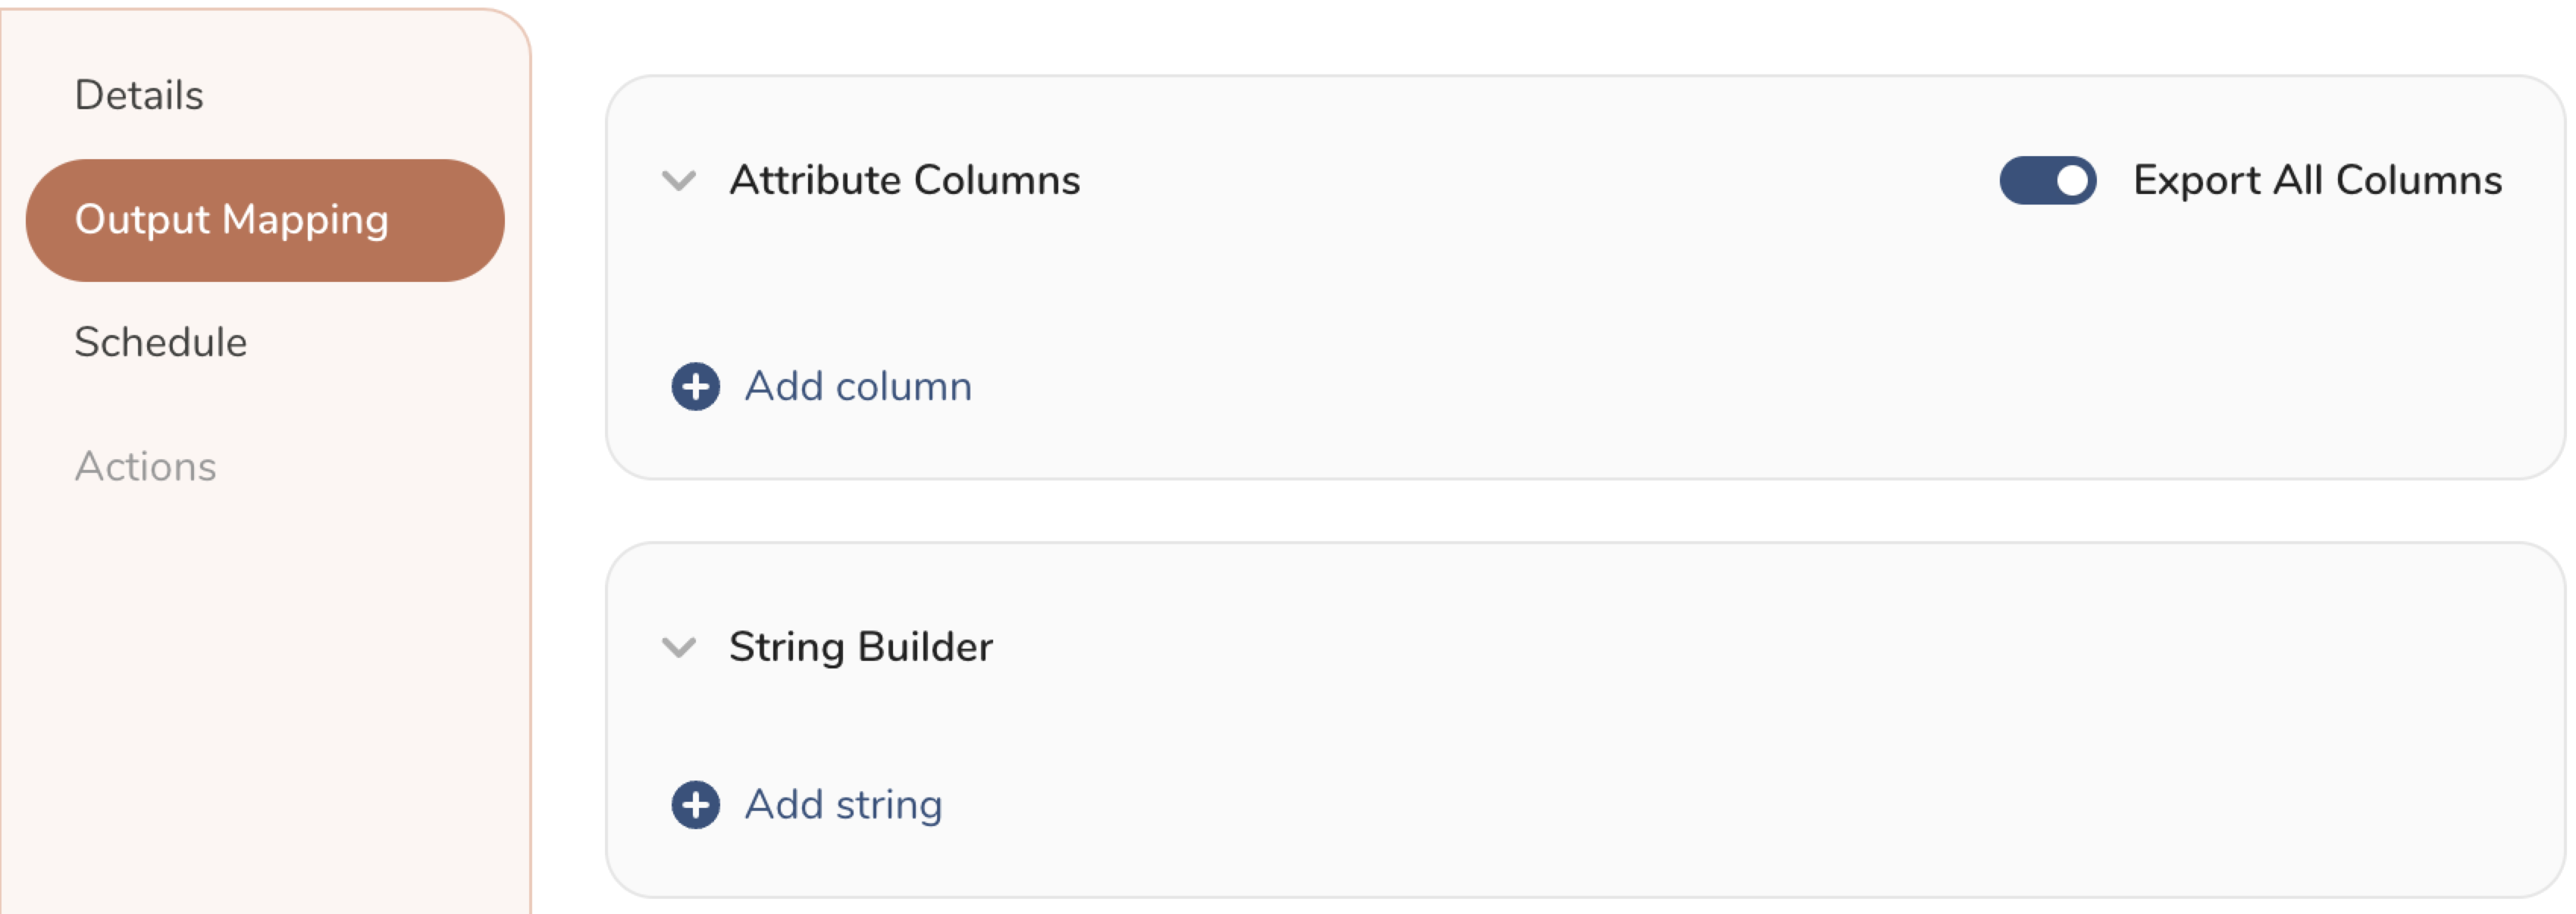
- Attribute Columns
- Select Export All Columns to export all columns without making any changes.
- Select + Add Columns to add specific columns for the export. The Output Column Name pre-populates with the same Source column name. You can update the Output Column Name. Continue to select + Add Columnsto add new columns for your activation output.
- String Builder
- + Add string to create strings for export. Select from the following values:
- String: Choose any value; use text to create a custom value.
- Timestamp: The date and time of the export.
- Segment Id: The segment ID number.
- Segment Name: The segment name.
- Audience Id: The parent segment number.
- + Add string to create strings for export. Select from the following values:
- Set a Schedule.
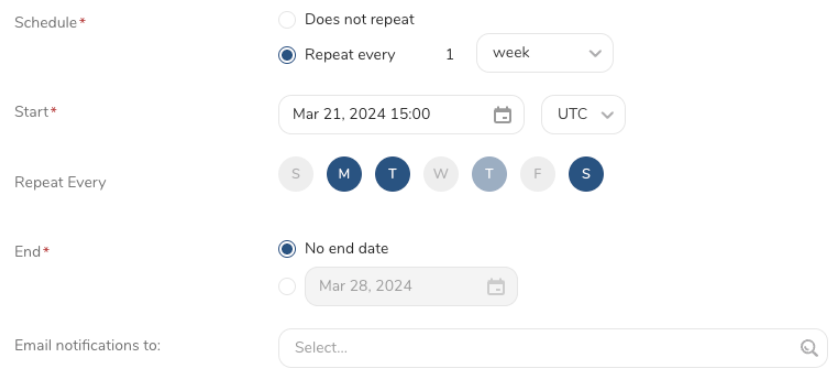
- Select the values to define your schedule and optionally include email notifications.
- Select Create.
If you need to create an activation for a batch journey, review Creating a Batch Journey Activation.
timezone: UTC

_export:
  td:
    database: sample_datasets

+td-result-into-one-drive:
  td>: queries/sample.sql
  result_connection: your_connection_name
  result_settings:
    account_type:
    replace_existing:
    file_name:
    folder_path:
    domain_name:
    server_relative_path:
    is_shared_folder:
    replace_existing:
    format:
    compression:
    header_line:
    null_string:
    newline:
quote_policy:Install the TD Toolbelt.
Add the OneDrive result output destination by using the -r / --result option for the td query command:
td query -d test_db -w \
'SELECT id, via FROM table1' \
--type presto -r \
'{"type":"one_drive", "refresh_token":"***","account_type":"personal","domain_name":null,"server_relative_path":null,"folder_path":"/abc","is_shared_folder":false,"file_name":"test_file","replace_existing":null,"format":"csv","compression":"","header_line":true,"null_string":"default","newline":"CRLF","quote_policy":null,"retry_count":"5","retry_initial_wait_millis":"1000","max_retry_wait_millis":"300000"}'Add the OneDrive result output destination by using the -r / --result option for the td sched:create command:
td sched:create every_6_mins "*/6 * * * *" \
-d test_db -w 'SELECT id, via FROM table1' \
--type presto \
-r '{{"type":"one_drive", "refresh_token":"***","account_type":"personal","domain_name":null,"server_relative_path":null,"folder_path":"/abc","is_shared_folder":false,"file_name":"test_file","replace_existing":null,"format":"csv","compression":"","header_line":true,"null_string":"default","newline":"CRLF","quote_policy":null,"retry_count":"5","retry_initial_wait_millis":"1000","max_retry_wait_millis":"300000"}'- Business Account Plan:
You need the domain name, server relative path, and folder path. Go to the Shared With Me tab on the browser:
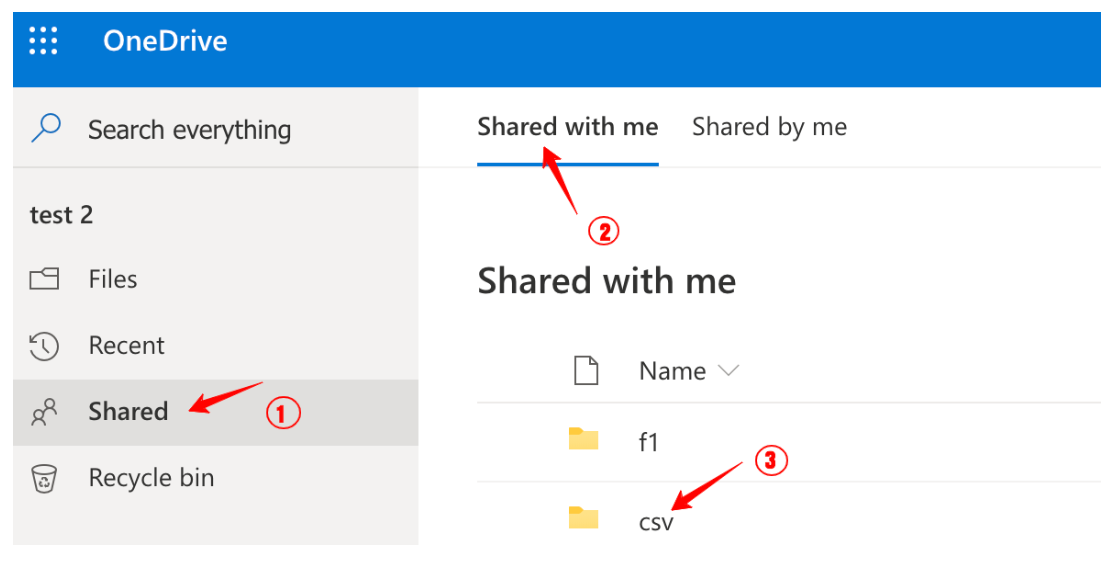 Select to open the shared folder and make note of the domain name, relative path and folder path as described in Domain Name and Relative Path.
- Personal Account Plan
You must set the field: This is a shared folder (is_shared_folder) to true, and drill down to the shared folder as shown in the image.
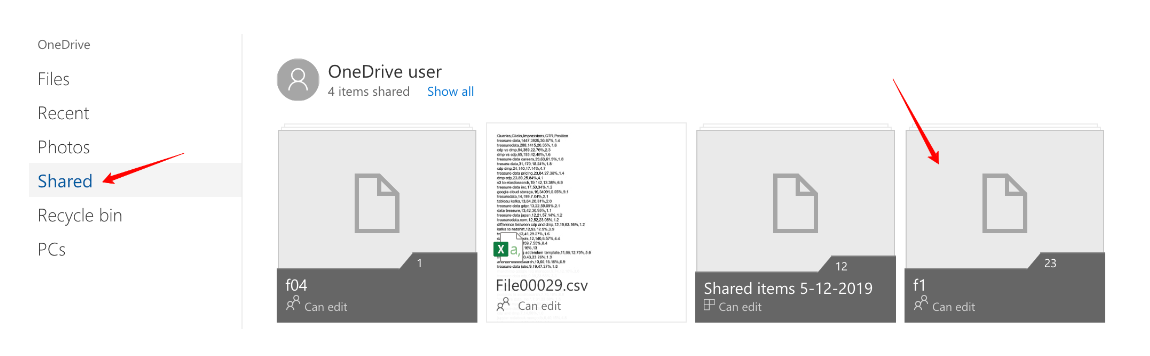 Select the shared folder f1 and navigate to the f2 target folder to import.
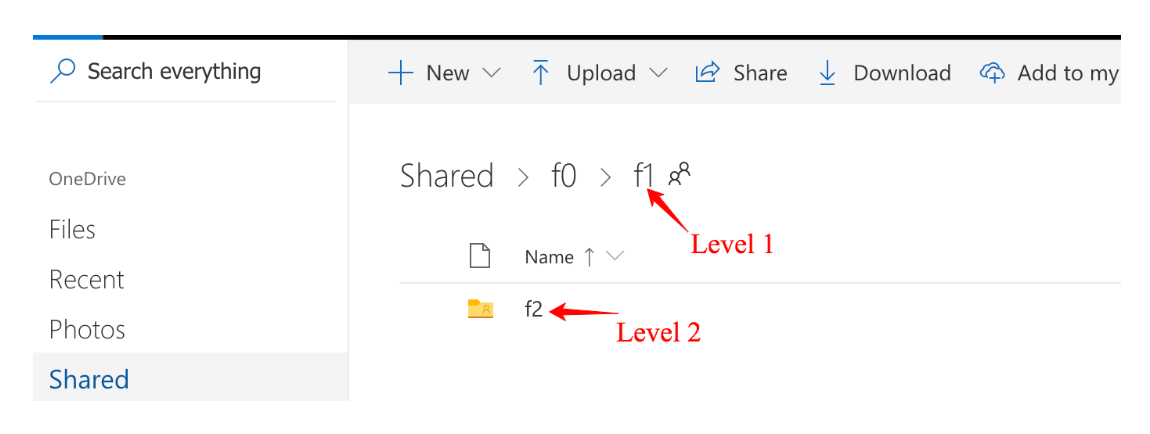 Input the folder path param as shown: folder_path: /f1/f2 (note: folder f0 is not shared with you)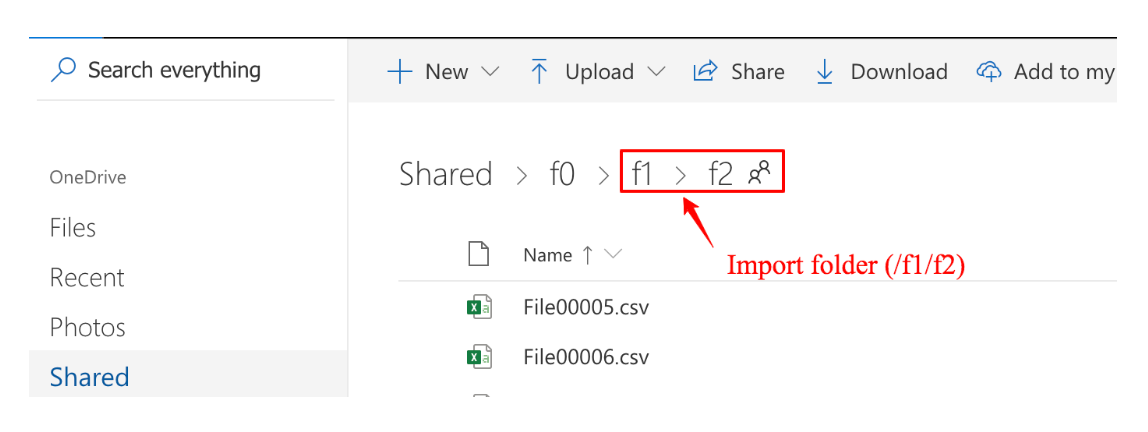
It can support '/sites' and '/teams' (including '/personal') as export path. Another path is not supported.
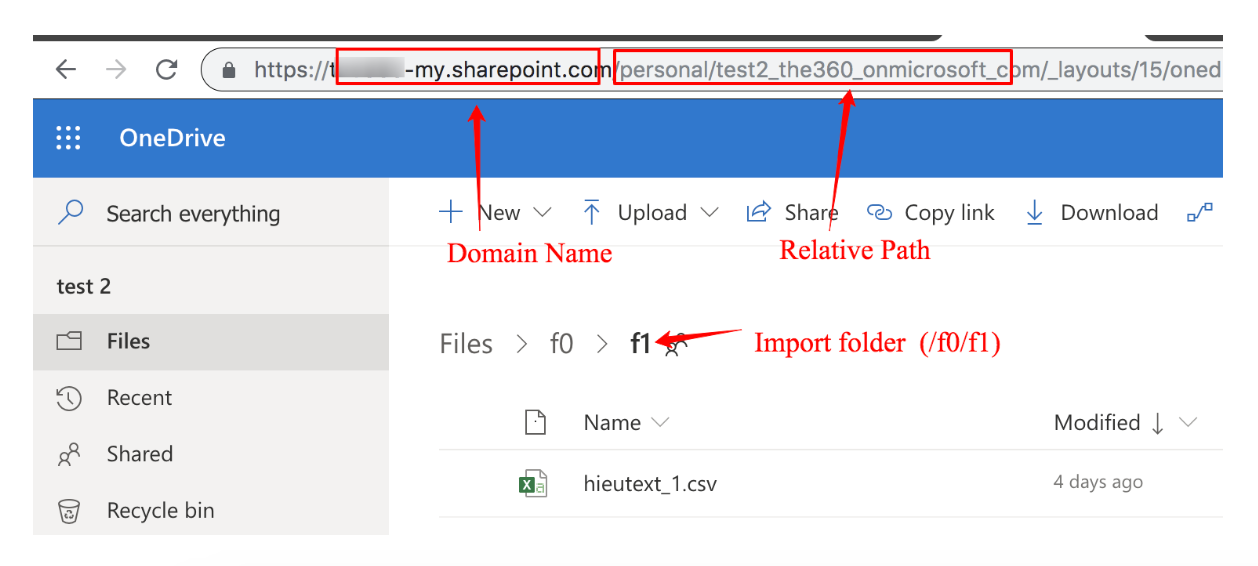
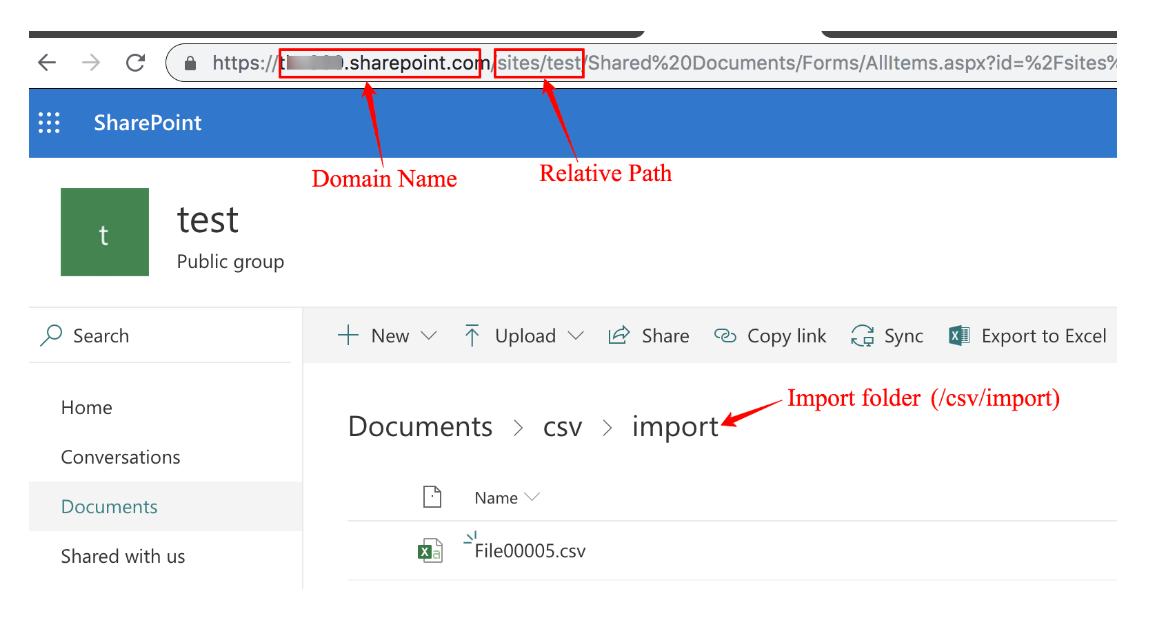
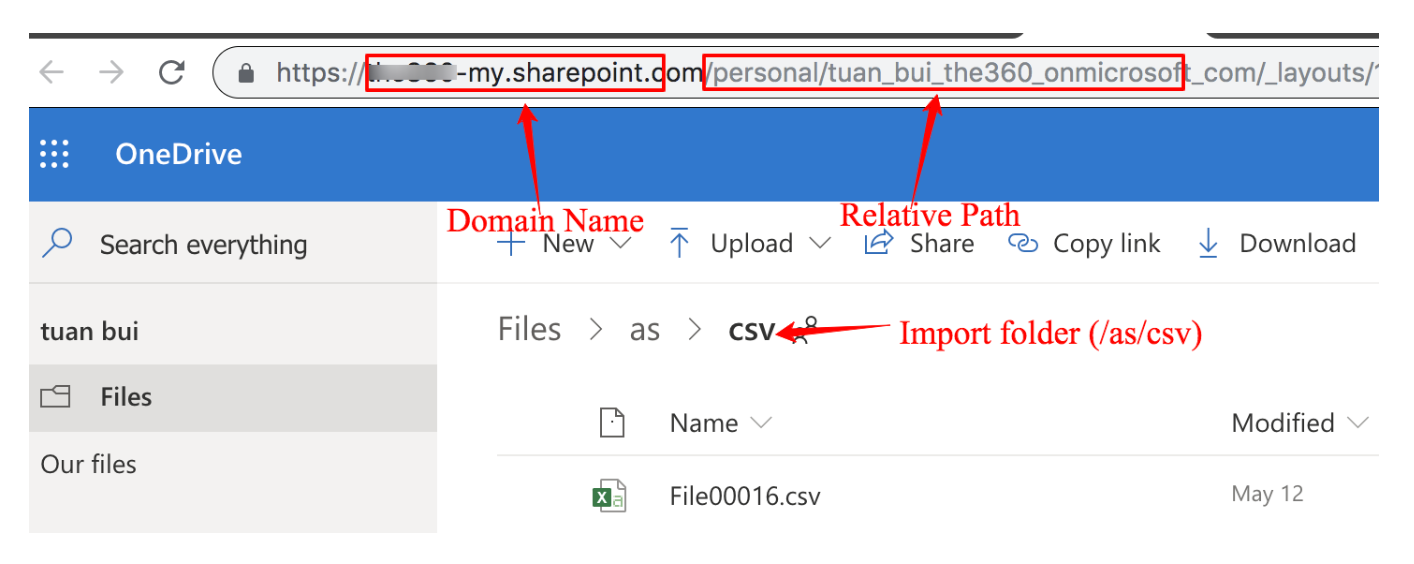
Domain Name and URL Relative Path are required to access your OneDrive business account plan, including your personal folder, SharePoint site collections, and folders shared with you.
Open the folder that you want to import on the browser. Then get the Domain Name and Relative Path as shown:
Personal folder
 SharePoint collection
 Folder shared with me
To issue jobs from CLI, you need client_id, client_secret, and refresh_token.
Register a developer account, and go to Azure App Registration Portal https://portal.azure.com/#home. On the search box, search for App Registration.
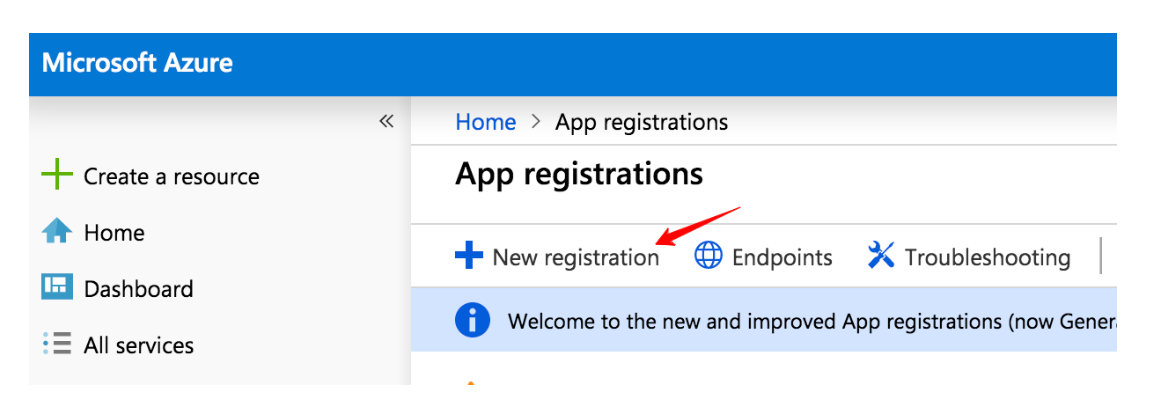
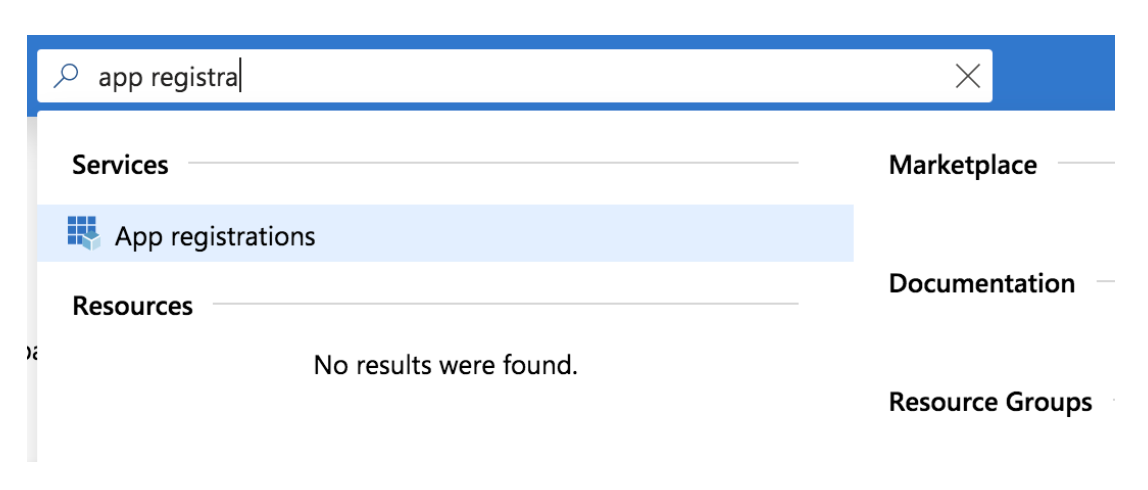 Select New Registration.
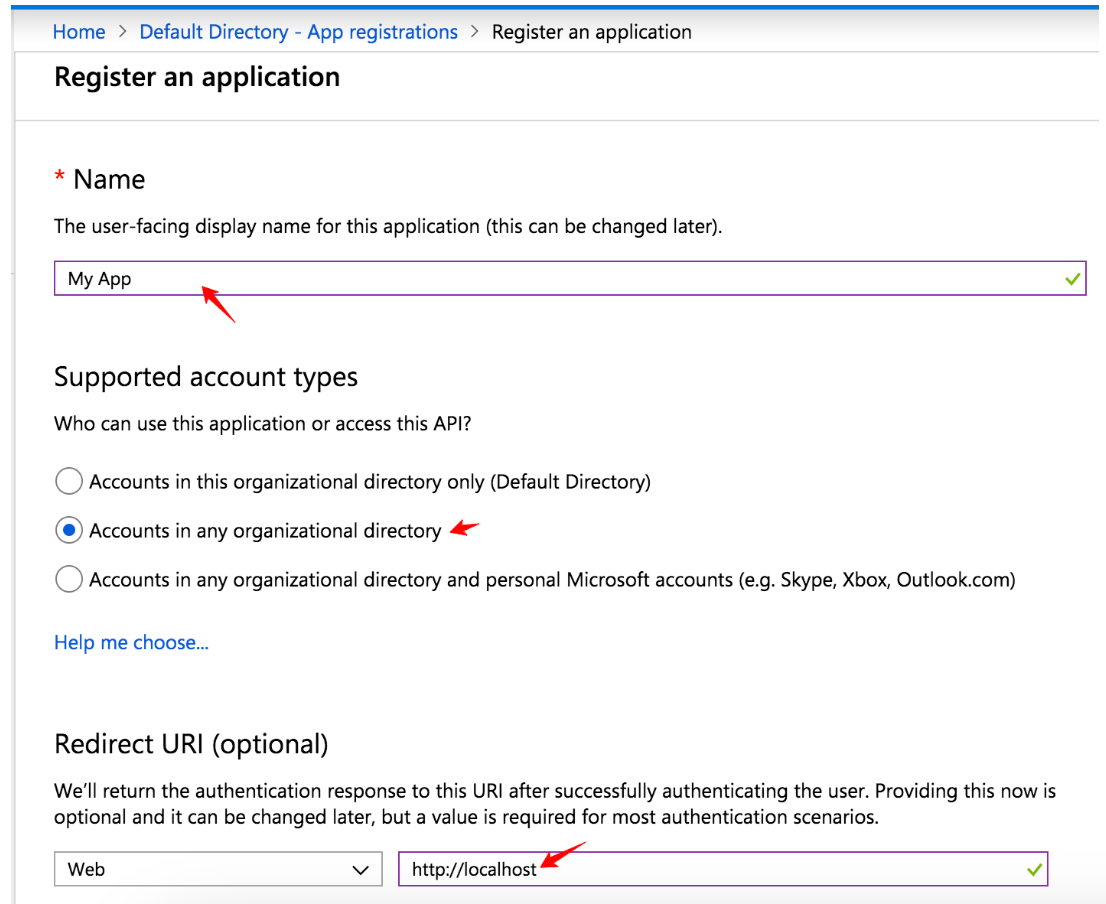
 Enter App Name, select Account Type and enter Redirect URI as shown. Select Register.
 From the App Permissions tab, select Add a Permission.
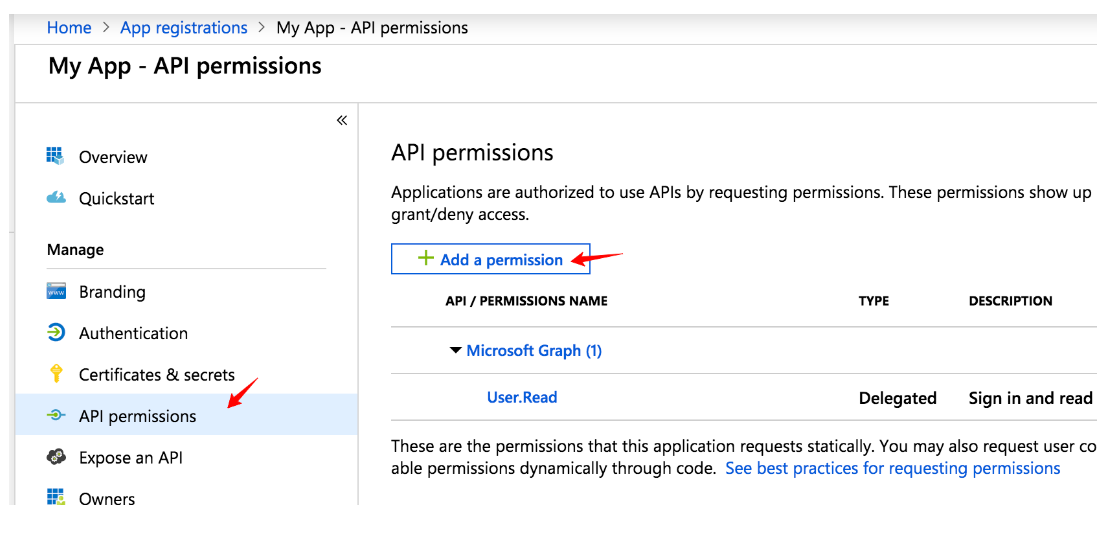 From Request API permissions window, select Microsoft Graph> Delegated permissions and add permissions as shown:
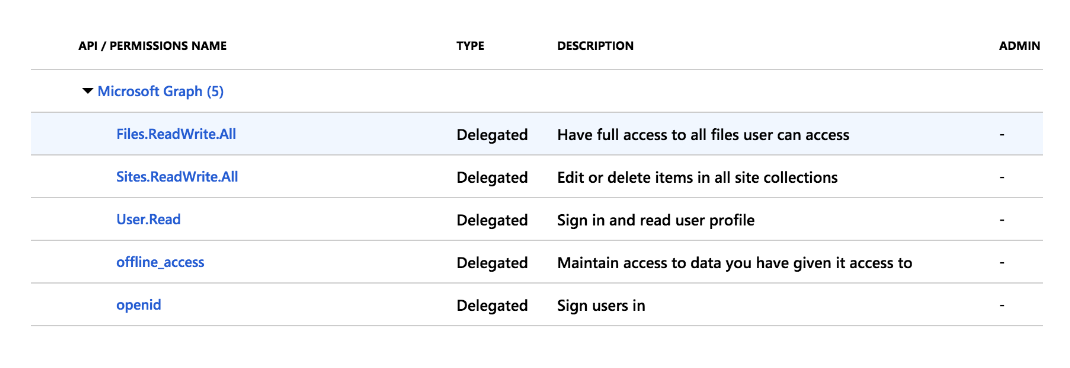 From the Certificates & secrets tab, select New client secret, select Never and Add.
A new client secret key is created as shown: 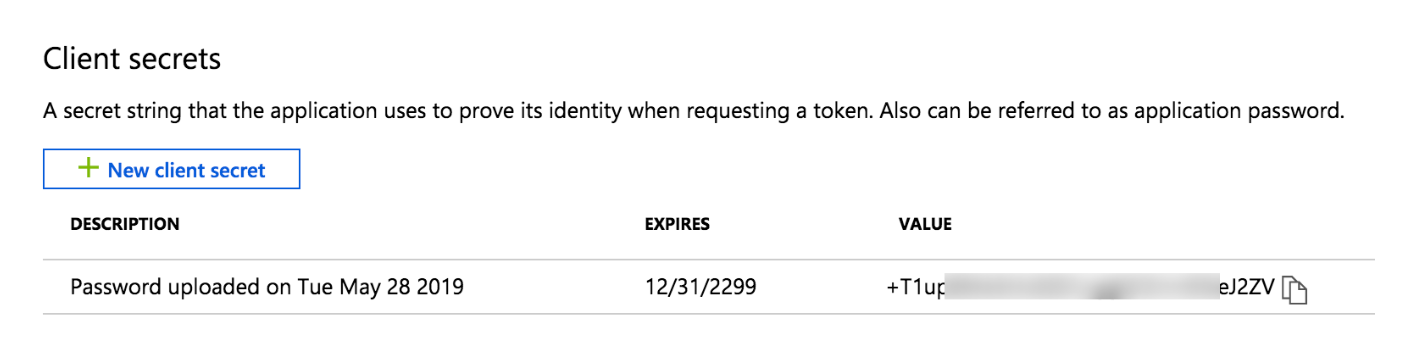
From the Overview tab, you see the client id as shown:
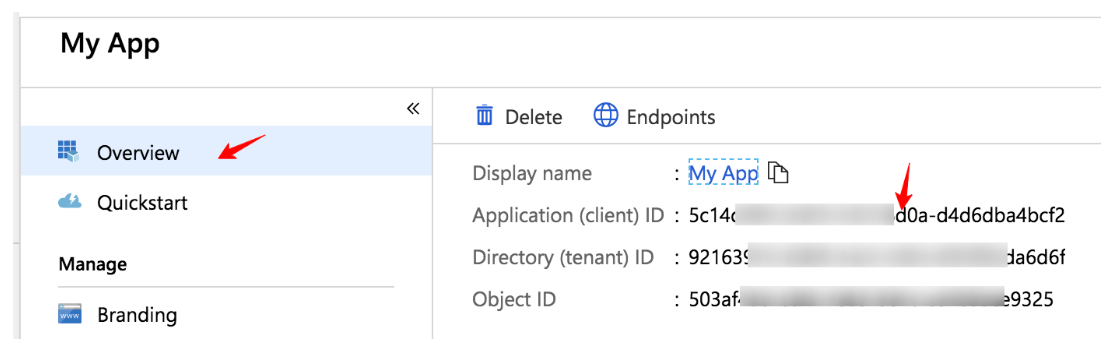 Replace the client_id in this URL and open it on a browser.
https://login.microsoftonline.com/common/oauth2/v2.0/authorize?client_id=xxxxxx&response_type=code&redirect_uri=http://localhost&response_mode=query&scope=offline_access files.readwrite.all openid sites.readwrite.all&state=1234Accept the Permission Request window.
Copy the code from the address bar:
 Replace the code, client_id, client_secret and run a curl command to get the access_token and refresh_token.
curl -X POST \ https://login.microsoftonline.com/common/oauth2/v2.0/token \ -H 'Content-Type: application/x-www-form-urlencoded' \ -d 'client_id={xxxxxx}&client_secret={xxxxx}&grant_type=authorization_code&scope=offline_access%20files.readwrite.all%20openid%20sites.readwrite.all&code={xxxxxx}&redirect_uri=http://localhost'OneDrive Connector will ask you for following permissions if you are using personal account:
| Permission | Description | Note |
|---|---|---|
| User.Read | Allows users to sign-in to the app, and allows the app to read the profile of signed-in users. It also allows the app to read basic company information of signed-in users. | |
| Files.ReadWrite.AppFolder | Allows the app to read, create, update, and delete files in the application's folder. | Application's folder is a dedicated, special folder for "TreasureData OneDrive Connector" app see What is an App Folder |
| Files.ReadWrite.All | Allows the app to read, create, update, and delete all files the signed-in user can access. | The import and export Connector shares the same client application and only performs read, create and update but not delete files. |
| offline_access | Allows the app to read and update user data, even when they are not currently using the app. | Use for schedule import/export |
Business/work account requests extra permission
| Permission | Description | Note |
|---|---|---|
| Sites.ReadWrite.All | Read and write all groups, Edit or delete items in all site collections | only performs read, create and update but not delete files. |
Although the Delete permission is granted by default as part of the Sites.ReadWrite.All permission, the data connector does not delete files on Microsoft OneDrive.