# .NET Apps Import Integration
td-agent was discontinued in December 2023 and has been replaced by **fluent-package**. The fluent-package is the official successor maintained by the [Cloud Native Computing Foundation](https://www.cncf.io/projects/).
Treasure Data provides [Fluentd](/products/customer-data-platform/integration-hub/streaming/td-agent/about-treasure-data-s-server-side-agent) to collect server-side logs and events, to stream data from .NET applications.
## Prerequisites
- Basic knowledge of .NET
- Basic knowledge of Treasure Data
### IP Whitelisting for Treasure Data Integrations
If your security policy requires IP whitelisting, you must add Treasure Data's IP addresses to your allowlist to ensure a successful connection.
Please find the complete list of static IP addresses, organized by region, at the following link:
[IP Addresses for Integrations](/apis/endpoints/ip-addresses-integrations-result-workers)
If you are unsure of your account's region or require further assistance, please contact your Customer Success representative or our Technical Support team.
## Installing Fluentd
Install Fluentd (fluent-package) on your application servers. Fluentd sits within your application servers, focusing on uploading application logs to the cloud.
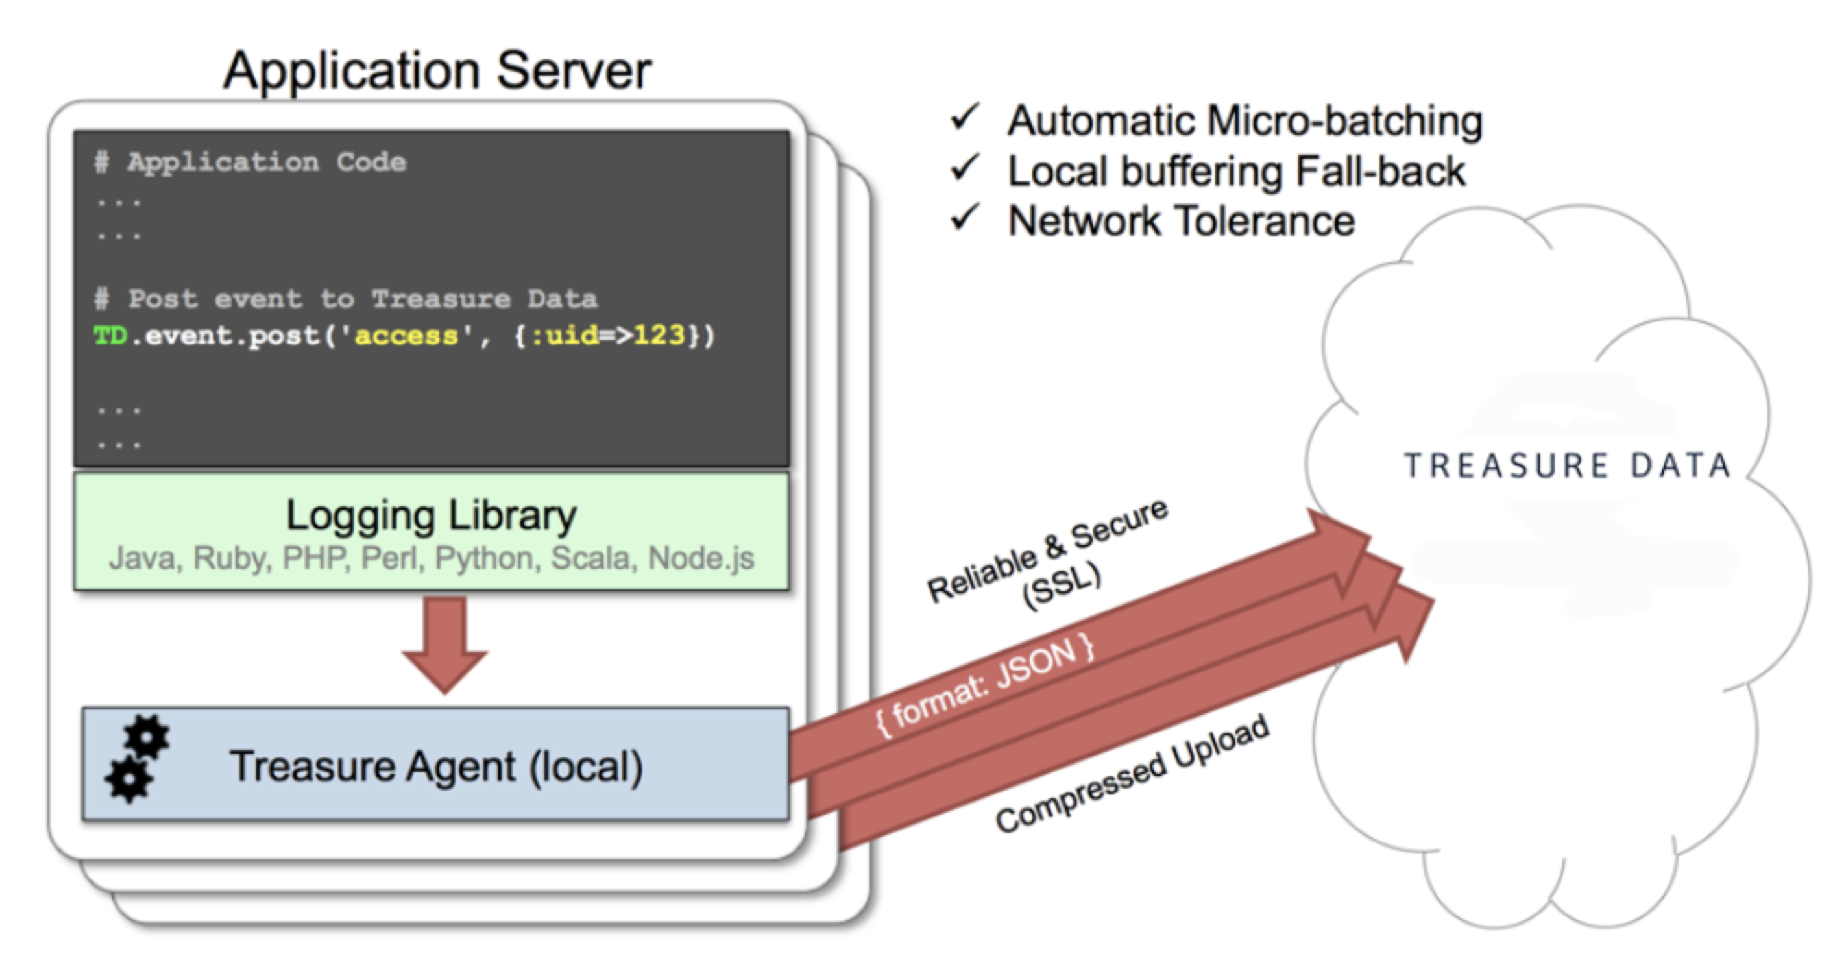
Fluentd receives the records via TCP/HTTP, buffers the records, and uploads the data to the cloud every 5 minutes. Because the daemon runs on a local node, the logging latency is negligible.
## Fluentd (fluent-package) Install Options
td-agent was discontinued in December 2023 and has been replaced by **fluent-package**. The fluent-package is the official successor maintained by the [Cloud Native Computing Foundation](https://www.cncf.io/projects/). For migration guidance from td-agent, see [Fluentd Installation Guide](https://docs.fluentd.org/installation/install-fluent-package).
To install `fluent-package`, run one of the following commands based on your environment.
### RHEL/CentOS/Rocky Linux
```bash
# fluent-package 6 LTS (recommended)
curl -fsSL https://fluentd.cdn.cncf.io/sh/install-redhat-fluent-package6-lts.sh | sh
```
### Ubuntu
```bash
# Ubuntu 24.04 Noble - fluent-package 6 LTS
curl -fsSL https://fluentd.cdn.cncf.io/sh/install-ubuntu-noble-fluent-package6-lts.sh | sh
# Ubuntu 22.04 Jammy - fluent-package 6 LTS
curl -fsSL https://fluentd.cdn.cncf.io/sh/install-ubuntu-jammy-fluent-package6-lts.sh | sh
```
### Debian
```bash
# Debian Bookworm - fluent-package 6 LTS
curl -fsSL https://fluentd.cdn.cncf.io/sh/install-debian-bookworm-fluent-package6-lts.sh | sh
```
### Amazon Linux
```bash
# Amazon Linux 2023 - fluent-package 6 LTS
curl -fsSL https://fluentd.cdn.cncf.io/sh/install-amazon2023-fluent-package6-lts.sh | sh
```
### Windows
Download the MSI installer from:
- [fluent-package 6 LTS for Windows](https://fluentd.cdn.cncf.io/lts/6/windows/index.html)
After installation:
1. Edit the configuration file at `C:/opt/fluent/etc/fluent/fluentd.conf`
2. Start the service using `net start fluentdwinsvc` or via Services administrative tool
### macOS
fluent-package for macOS is planned to be available via Homebrew. For current installation options, see [Fluentd Installation Guide](https://docs.fluentd.org/installation).
## Starting the Service
After installation, start and verify the Fluentd service.
### Linux
```bash
sudo systemctl start fluentd.service
sudo systemctl status fluentd.service
```
The configuration file is located at `/etc/fluent/fluentd.conf`.
### Windows
```cmd
net start fluentdwinsvc
```
The configuration file is located at `C:\opt\fluent\etc\fluent\fluentd.conf`.
### macOS (gem installation)
```bash
fluentd -c /path/to/fluentd.conf
```
For more details, see the [Fluentd Documentation](https://docs.fluentd.org/).
## Modifying fluentd.conf
Specify your API key by setting the `apikey` option in your `/etc/fluent/fluentd.conf` file (for fluent-package).
```conf
# Input from HTTP
@type http
port 8888
# Treasure Data Output
@type tdlog
endpoint api.treasuredata.com
apikey YOUR_API_KEY
auto_create_table
use_ssl true
@type file
path /var/log/fluent/buffer/td
```
*YOUR_API_KEY* should be your actual API key string. You can retrieve your API key from your profile in Treasure Console. Using a [write-only API key](/products/my-settings/getting-your-api-keys) is recommended.
Restart the Fluentd service after the following lines are added:
```bash
# Linux
sudo systemctl restart fluentd.service
# macOS (gem installation)
# Restart the Fluentd process manually
```
Fluentd accepts data via port 8888, buffers the data (`/var/log/fluent/buffer/td`), and automatically uploads the data into the cloud.
## Post the Records via HTTP
Use the following code snippets to post the records to the local Treasure Agent via HTTP.
```
using System;
using System.Net;
using System.IO;
using System.Text;
using System.Web;
namespace CSharpTreasureAgentExample
{
class MainClass
{
public static void Main (string[] args)
{
string json_body = "{\"action\":\"login\",\"user\":2}";
string tag = "td.production.login";
// Prepare HTTP Request Object
HttpWebRequest request = (HttpWebRequest)WebRequest.Create("http://localhost:8888/" + tag);
request.Method = "POST";
request.ContentType = "application/x-www-form-urlencoded";
json_body = "json=" + System.Web.HttpUtility.UrlEncode(json_body);
byte[] bytes = Encoding.ASCII.GetBytes(json_body);
request.ContentLength = bytes.Length;
// Write the Request
Stream stream = request.GetRequestStream();
stream.Write(bytes, 0, bytes.Length);
stream.Flush();
stream.Close();
// Receive the Response
HttpWebResponse response = (HttpWebResponse)request.GetResponse();
if (response.StatusCode == HttpStatusCode.OK) {
using (StreamReader reader = new StreamReader (response.GetResponseStream ())) {
Console.WriteLine (reader.ReadToEnd ());
}
}
response.Close();
}
}
}
```
## Confirming Data Import
Execute your program.
Sending a SIGUSR1 signal will flush Fluentd's buffer. The upload starts immediately.
```bash
# Linux
$ kill -USR1 $(cat /var/run/fluent/fluentd.pid)
# macOS (gem installation)
# Send SIGUSR1 to the Fluentd process
```
#### From Treasure Console
To confirm that your data has been uploaded successfully, check your dataset in the Treasure Console, Databases view.
#### From CLI
Or, issue the *td tables* command if you have a CLI client.
```
$ td tables
+------------+------------+------+-----------+
| Database | Table | Type | Count |
+------------+------------+------+-----------+
| production | login | log | 1 |
+------------+------------+------+-----------+
```
## Production Deployments
### High-Availability Configurations of Fluentd
For high-traffic websites (more than 5 application nodes), use a high availability configuration of Fluentd to improve data transfer reliability and query performance.
- [High-Availability Configurations of Fluentd](/products/customer-data-platform/integration-hub/streaming/td-agent/configuring-td-agent-for-high-availability)
### Monitoring Fluentd
Monitoring Fluentd itself is also important. For general monitoring methods for Fluentd, see [Monitoring Fluentd](/products/customer-data-platform/integration-hub/streaming/td-agent/monitoring-td-agent).
Fluentd is fully open-sourced under the [Fluentd project](http://fluentd.org/).